Showing posts with label Cool Tricks. Show all posts

Configure or Turn Off DEP (Data Execution Prevention) in Windows

It can cause issues with some older third-party software

Data Execution Prevention (DEP) is one of those ‘blursed’ things. It’s a blessing most of the time when it does its job and doesn’t interfere, but cursed when it does interfere. 

Let’s look at DEP and how to configure it, or turn DEP off, depending on your needs.

What Is DEP & What Does It Do?
According to Microsoft, DEP is :
“…a set of hardware and software technologies that perform additional checks on memory to help prevent malicious code from running on a system.”  

Dell simplifies it a bit and tells us that DEP

“…can help protect your computer by monitoring your programs to make sure that they use system memory safely.”


What does that mean? There are certain areas in the computer’s memory which aren’t intended to have code running in them, but sometimes code does run there. 

Usually, the code that will run there is malicious. DEP will monitor those areas and if it sees something going on in those areas it will shut it down. If you want to get in-depth about how it works, read Microsoft’s detailed description of Data Execution Prevention.

So Why Does DEP Cause Problems?
Even today, computers are dumb. They cannot reason, they can only use the most basic of logic. Plus, that logic is put into them by humans so computers also get our mistakes put into them. 

Sometimes, good programs will wander off into the areas that DEP monitors and work in those spaces.


When this happens, DEP will sometimes shut the entire program down and let you know via an error message. But sometimes DEP will just cause the program to run very poorly and there won’t be anything obvious to tell you why. 

What Programs Have Problems With DEP?
Programs that conflict with DEP are typically older programs or built on old codebases. A lot of Enterprise Resource Planning (ERP) software is built on codebases that go back to the 1970s. There was no DEP then, so the program will go into areas that DEP patrols.

64-bit programs were created after DEP was well established, so they were developed to comply. Most programs that conflict with DEP will be 32-bit programs. 

Non-Microsoft programs that interact with Windows Services heavily or run their own Windows Services may be tripped up by DEP. If that is the case, the vendor will recommend to completely turn off DEP.

For the home user, old games that are 32-bit, and some emulators for playing even older games, are the most likely to conflict with DEP.

Old device drivers or drivers downloaded from unofficial sources may also trigger DEP errors. Only download drivers from the hardware manufacturer or Microsoft, and update your drivers regularly.

How Do I Know If DEP Is The Problem?
You may have to go into Event Viewer and sift through the logs for Event ID 1000. If you find one, it may look like this:

Event ID : 1000 - DEP Error : Generic host for Win32 servicesGeneric Host Process for Win32 Services - DEP : Application Error
Event Type: Error
Event Source: Application Error
Event Category: (100)
Event ID: 1000
 You may see other errors referencing things like:

  • 0xFC:ATTEMPTED_EXECUTE_OF_NOEXECUTE_MEMORY – occurs when a device driver is trying to run in memory. It may be a bad or outdated driver. You’ll want to update your drivers. 
  • STATUS_ACCESS_VIOLATION (0xc0000005) – occurs when programs are trying to run in DEP protected memory space.
How To Configure Or Turn Off DEP
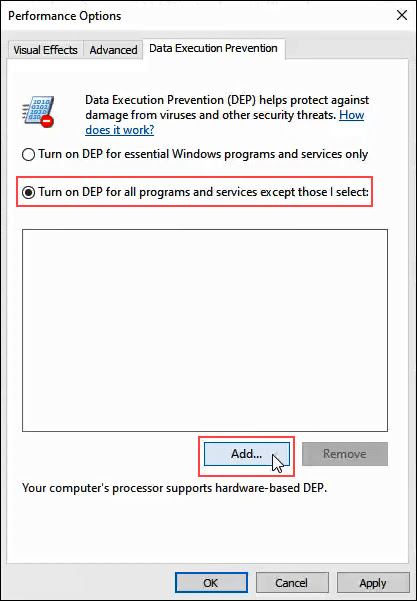
In Windows 10, DEP defaults to the setting Turn on DEP for essential Windows programs and services only. Most of the time, this is sufficient. It means that the majority of your programs will be ignored by DEP. 

But if DEP helps protect the computer and it doesn’t have a performance hit, you may want to select Turn on DEP for all programs except those that I select. Then if you find a program that has a problem with DEP, we can add it as an exception. Let’s look at how to do that.
  • Open the Control Panel then open System.

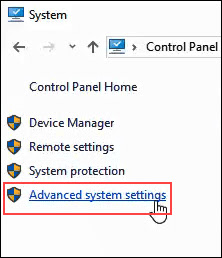
  • On the left side of the System window, click on Advanced System Settings.
  • The System Properties window should open and already be set to the Advanced tab. In the Performance area, click on Settings.
  • In the Performance Options window, click on the Data Execution Prevention tab.


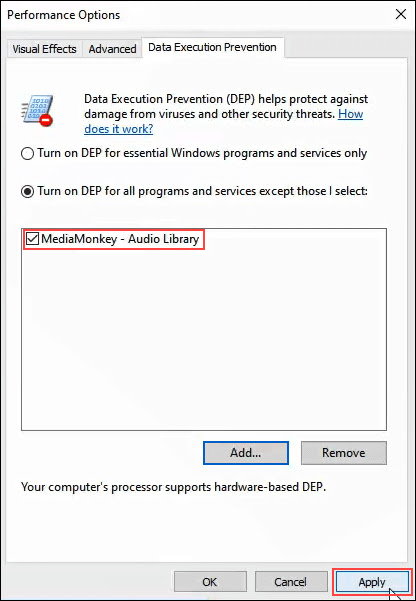
  • With Turn on DEP for all programs except those that I select selected, click on the Add button near the bottom of the window.


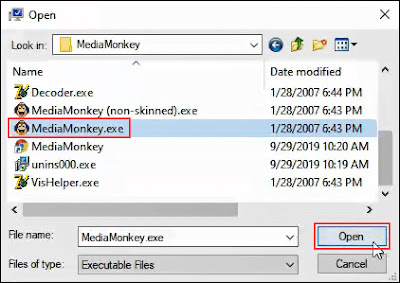
  • Navigate to the executable for the program that we’d like to add as an exception. It will most likely be in C:/Program Files (x86). 
  • In this example, we’re adding MediaMonkey, an old music player utility. Click on the .exe file once we find it and click on Open.


  • In Performance Options, click on Apply. Now, MediaMonkey will run outside of DEP protection while all others will run within DEP protection.
Turn DEP Completely Off

If you want to turn DEP completely off, we advise only doing that as part of troubleshooting an issue. DEP is there for your protection. 

Since it’s something that isn’t advised, there isn’t a good point-and-click way to do it. Let’s look at how we can turn off DEP.
  • Open the Command window as Administrator. Do this by typing cmd in the program search field near the Start menu.

  • Enter the command bcdedit.exe /set {current} nx AlwaysOff and press enter.


bcdedit.exe is a Windows utility for editing boot configuration data, hence     .

/set tells bcedit to set an option value entry in the boot configuration.

{current} tells becedit to work with the boot configuration being used right now.

nx is short for no execute and is the setting name for DEP in the boot configuration.

AlwaysOff is self-explanatory.
  • Restart the computer.
  • DEP will now be completely, and permanently off.

Turn DEP On For Everything
To turn DEP on for absolutely everything, the process and command is like above.

  • Open the Command window as Administrator, following the instructions in the procedure above.
  • Enter the command bcdedit.exe /set {current} nx AlwaysOn. 
        

  • Restart the computer.
  • DEP will be turned on and all programs monitored.
After turning DEP to being always on or always off, it CANNOT be changed via the Data Execution Prevention tab in system settings. 

Let’s look at how to change it so that the radio buttons in the DEP tab can be used again.

Set DEP Back To Default Behavior
To set DEP behavior back to default and make it manageable again via system settings, do the following.
  • Open the Command window as Administrator.
  • Enter the command bcdedit.exe /set {current} nx OptIn.

  • Restart the computer.
  • Now the radio buttons in the DEP tab in systems settings are accessible again.
To DEP Or Not To DEP
We recommend leaving DEP on its default setting of Turn on DEP for essential Windows programs and services only, unless it’s necessary to change it to troubleshoot problems that may be DEP-related.
How To Fix The Memory Management Error In Windows 10

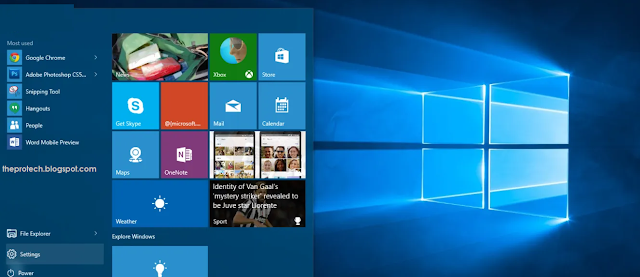
 Memory_Management  is one of the most unhelpful phrases that Microsoft suggests you search for if you run into a BSOD (Blue Screen of Death) error while running Windows 10. So, how do you fix the memory management issue?

Window 10

The first step in fixing any computer problem is isolating the issue’s source, so you know what to fix. With Window’s ominous errors, such as this one, it may be challenging to know where to begin.

Basic troubleshooting is essential to finding your memory management error. Let’s take a look at what you can do to get this fixed.

Step 1: Run Windows 10 in Safe Mode

The first thing you should do is launch Windows 10 in safe mode with basic drivers. This action allows you to check whether you still receive the BSOD Memory Management error. Essentially, this shuts down any processes the computer doesn’t need. If the memory management error ceases, you’ll know it isn’t hardware but rather something in the software, such as a patch in an update or a driver. If the problem still occurs, you may need to replace some faulty hardware. To boot your system in Safe Mode, follow the steps below.

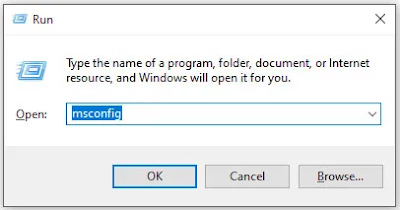
  1. Use the Win+R keyboard shortcut and type “msconfig“ without quotes, then hit “enter.”

Run Command

    2.    Tap the “Boot” tab in the upper section of the screen.

    3.Select “Safe Boot.”


    4.Choose “Minimal” from the list of boot options.


Step 2: Run Windows Memory Diagnostic

The Windows Memory Diagnostic tool will test your SDRAM and report any problems it finds—if any at all. This step should use Safe Mode to prevent the BSOD issues you experience. However, this requirement is after affirming that your PC worked correctly in Safe Mode using Step 1 above.

  1. Press the “Windows + R” keyboard combination and type “mdsched” without quotes, then press “Enter” or click “OK.”

     2.Select the option to restart and run a check for SDRAM problems.


Upon restart, you will receive a report letting you know if you’re having a memory issue.

As the name suggests, the memory management error relates to the computer’s memory, which can be a physical problem with the installed RAM. The Windows Memory Diagnostic Tool can help discover if this is the root of the problem.

When Windows restarts, it will tell you if there is something wrong with your memory. If there is, then you’ll have to either replace the RAM yourself or send back your computer if it’s under warranty.

Step 3: Run SFC Scanner
SFC Scanner is a Microsoft tool for detecting various problems with your system, and running it seems to have solved some people’s memory management woes. Once again, this step should also be performed in Safe Mode like Step 1 and Step 2 above.

  1. In the Cortana search bar, type “cmd” without quotes, then click on “Run as administrator” in the right panel for the Command Prompt. You can’t use the right-click Start Menu option anymore since Powershell replaced Command Prompt.

    2.Once the Command Prompt opens, type “sfc/scannow” without quotes and press “Enter.”

SFC Scanner will now run through your system, seeing if it finds any disk errors to fix. Even if it doesn’t find anything, some users have found that their computers play nicer after a full scan.

Note: It is best to perform two or three rounds of scanning since the process doesn’t always detect anything on the first attempt or fixes something else and needs to find more issues.

Step 4: Look for Software Problems
Software problems are a little more challenging to pin down. Still, if the memory management error is a relatively new phenomenon, you could try undoing some of your recent software installations to see if it fixes the problem.

Specific pieces of software often link to memory management errors. You can try disabling and re-enabling newer software to see if that fixes the BSOD, or you can reload Windows 10 entirely (although this is a nuclear option).

Isolating and correcting a software issue or even a corrupted file can take a while, but it’s certainly worth it if you’re not entirely sure you’re experiencing a hardware failure.

Step 5: Update Your Graphics Card Drivers
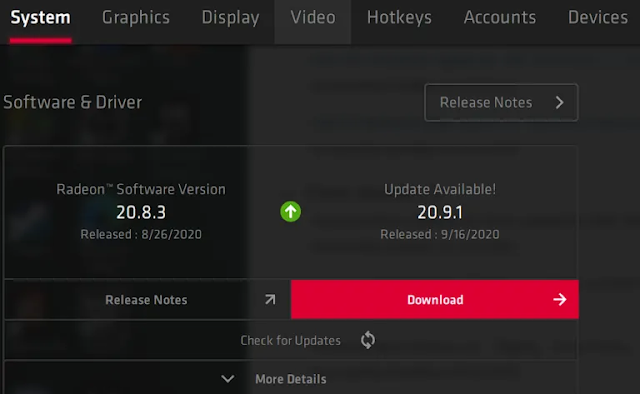
One of the most common causes of the memory management error in Windows 10 is outdated or broken graphics card drivers. This scenario makes sense, especially since the graphics card has memory too. If you’re not running the latest version, try installing the newest available.

If you already have the latest drivers, try the “uninstall/reinstall” method. Sometimes, a driver is broken or corrupt but goes undetected. The drivers you need will depend on your graphics card, of course. Windows 10 will be able to tell you what you have in your system, but it’s likely to be onboard Intel graphics or something from Nvidia or AMD. External video cards have more memory than onboard graphics, and they are more prone to overheating.
Graphic Information

Visit the website of the manufacturer and download any updates to get your system working correctly again.

Step 6: Upgrade Your PC’s Hardware
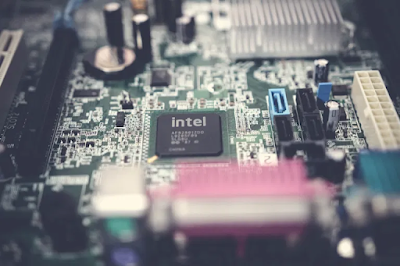
Depending on the results of your troubleshooting adventures, it may be time to upgrade some of your system’s hardware. As software and PC technology progress, so does hardware requirements.

Before rushing out to buy new hardware, check to ensure that everything in the case is seated correctly. Perhaps you recently moved your machine, and something came loose, or your hardware could use a thorough cleaning.

If it’s a machine that you’ve built or one that is out-of-warranty, it’s time to look for new components to get your computer up and running again. It may be an opportunity for a new graphics card, or you may need more RAM. Whatever the case, if you’ve tried everything above and the issue persists, it’s likely hardware-related.

How to Capture a Scrolling Screenshot in Windows 10


Scrolling image

Windows 10 offers many ways to capture a screenshot. To take a screenshot, all you need to do is press Ctrl + PRTSC or Fn + PRTSC and you instantly have a screenshot. There is even a built-in Snipping Tool that allows you to capture a section of a window as well as pop-up menus.

But all those methods only allow you to capture content that is within the dimensions of the browser’s viewing area. What if you want to capture a screenshot of a scrolling window of a webpage, document, or any other content that’s beyond the viewable area? In such cases your only option would be to use a third-party application

In this post you’ll learn the best tools to capture a scrolling screenshot in Windows.

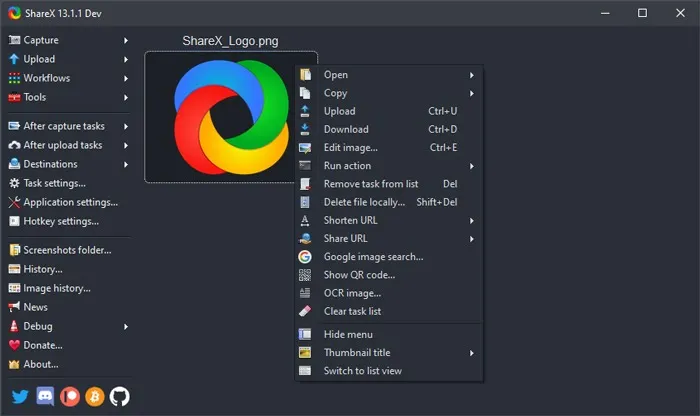
1. ShareX

Available to buy on its own website as well as the Steam gaming platform (where it has “Overwhelmingly Positive” reviews, as well as having its own well-populated Discord channel, the free screen capture app ShareX is validated by its broad popularity in the discerning game-streaming community.

ShareX

The open-source app is widely used by gamers for its robust screen-capture options. Among those features – which include video capture, GIFs, region-select, workflows, as well as a huge number of filters and effects to add to your captures – is the “scrolling screenshot” option you’re looking for here.

Just open ShareX, click Capture then “Scrolling capture”. Once you select your region, you can specify which window you want to scroll, whether you want there to be a delay before the screen-capture starts, and how many scrolls you want to capture.

It’s nice and easy to use, and unlike other options on this list it’s free without caveats, maintained as it is by a diligent community of open-source developers. Beyond just scrolling, it also functions as an all-in-one screen capture suite, which is pretty impressive given its small file size.

2. PicPick

PicPick is a robust screen-capture and image-editing software developed and owned by NGWIN. It’s my personal favorite screen capture tool, and I use it all the time. The best thing about PicPick is that it’s free for personal use and packs some cool features you won’t find even in the paid programs.

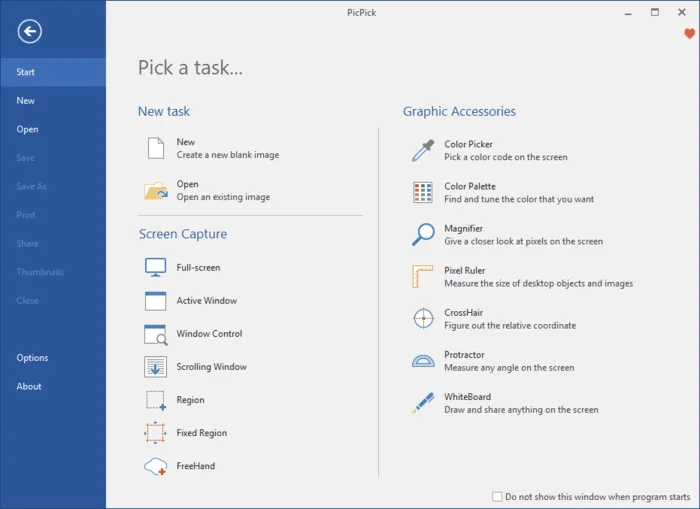
PicPick

As far as screen capture is concerned, PicPick offers seven screen capture modes: Full screen, Active Window, Window Control, Scrolling Window, Region, Fixed Region, and FreeHand. Each of these modes suits different scenarios and can help you customize your screenshots to your liking. For example, the Region mode can help you to isolate and capture a dialogue box without background noise.

Fixed Region mode allows you to set your desired screenshot length and width in terms of pixel count which helps to ensure all your screenshots are uniform. It also has a Scrolling Window mode that lets you capture a scrolling screenshot of a webpage or a document in just a few clicks.

PicPick Options

To capture a scrolling window, follow the steps below:

1. Press and hold Ctrl + Alt together, then press PRTSC. A rectangular box highlighted in red will appear.

2. Press and hold the left mouse button, then drag the mouse on the scrolling window to select the area.

3. Release the mouse click and an auto-scroll will happen slowly. After that, your entire window will be captured in just a few seconds.

PicPick also comes with a pixel ruler which can be used to measure the size of images that are displayed on your screen, a virtual whiteboard that allows users to draw on the screen, and crosshairs for pinpointing the positions of relative pixels.

3.Snagit

Snagit is a popular screenshot-capture and video-recording software created and distributed by TechSmith. It features a sleek interface that is more focused than PicPicks.

Snagit
    

It also boasts of superior image-editing functionalities that are more polished than those of PicPicks. However, Snagit is not free and costs $50 per license, which is relatively high.

Because the main focus of Snagit is on screenshot capture, it comes with advanced screen capturing and editing features that blow the competition out of the water. For example, it has a Panoramic Capture feature that allows you to capture just a portion of a scrolling Window.

Capturing a scrolling window on Snagit is also easier and more user-friendly. All you have to do is navigate to the all-in-one-tab and click the “Capture” button. Then click on the yellow arrows depending on the direction you want to scroll. Snagit will capture everything visible on the window and create a single image that you can edit. Here’s a short video on how to capture a scrolling screenshot with Snagit.

Besides capturing screenshots, Snagit can also record screen activity. Its superior editing features also make it the best tool for creating tutorials.

4. Apowersoft Screen Capture Pro

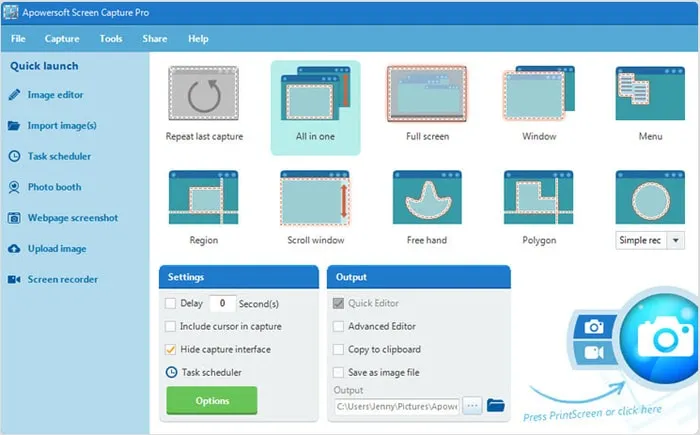
Apowersoft Screen Capture Pro is an innovative and highly-customizable screenshot-capture and image-editing tool. The program leaves no stone unturned when it comes to screenshot capturing, thanks to its ten screenshot modes, which includes Scrolling screenshots, Menu, and Freehand, just to mention a few.

Apowersoft

The scrolling Window capture mode allows you to capture an entire webpage, document, or browser, including contents hidden from the viewer. It also comes with a “Task Scheduler” that you can also use to take automatic screenshots.

In addition to screenshot capturing, Apowersoft Screen Capture Pro comes with a robust image editor which provides a wealth of options for you to edit your screenshots. What’s more, you can also use this tool to record the screen, upload, and share online. However, the program is quite expensive. A lifetime license goes for $79.95. You can also opt for monthly subscriptions starting from $12.95 per month.

5.GoFullPage - Full Page Screen Capture

Capture a screenshot of your current page in entirety and reliably—without requesting any extra permissions! -GoFullPage

The simplest way to take a full page screenshot of your current browser window. Click on the extension icon (or press Alt+Shift+P), watch the extension capture each part of the page, and be transported to a new tab of your screenshot where you can download it as an image or PDF or even just drag it to your desktop.

*No bloat, no ads, no unnecessary permissions, just a simple way to turn a full web page into an image.*

The advanced screen capture technology handles complex pages—including inner scrollable elements as well as embedded iframes—unlike any other extension. If you encounter an issue, please report it via the customer support flag icon on the capture page, so we can improve the extension for you and everyone else who uses it.

Knowing how to capture scrolling screenshots can be of great use to you, especially if you’re looking into creating some instructional content. Scrolling screenshots can also come in handy when you want to report software issues, as you’ll be able to point out the issues clearly.

How to Recover Deleted WhatsApp Images/Pictures from Android and iOS Devices

Today i got a call from one of the important person of my life Preetveer Singh (a best friend cum brother) being facing a problem of whatsapp recovery as we all know WhatApp is an integral part of our everyday communication, and any lose of data is highly frustrating. Losing your WhatsApp images is like a nightmare. But surprisingly it happens more often than you know, and recovering these deleted WhatsApp photos is not easy unless you have a robust solution like a WhatsApp recovery software.
If you are struggling with data lost, then this article will definitely be a lifesaver. Go through this comprehensive guide to know how to recover deleted WhatsApp photos and other data for iOS and Android devices like a pro.
recover whatsapp images
I have came up with a few solutions for you-


Part 1: How to Recover Deleted WhatsApp images Selectively on iOS Devices
Part 2: How to Recover Deleted WhatsApp images Selectively on Android Devices
Part 3: How to Recover WhatsApp images from Auto-Backup

(Activate Now)How To Activate Jio Prime Membership

Jio Prime Activation: Hi There and Welcome to The Protech. Form today onwards subscription or activation for Jio Prime Membership has begin only till 31 March 17. So don't waste your time.
Follow these 3 methods listed below and activate your Jio Prime Membership.
 Prime Membership Plan Benefits

1. Daily 1GB 4G Data (Unlimited At 256 Kb).

2. Daily 1GB 4G Wifi Data At Rs 10.

3. Unlimited Voice Calls And Unlimited SMS (100 SMS) Daily.

4. Unlimited Usage Of Jio Videos,Movies,Apps Subscription worth Rs.10000.

Must Read this before Buying Jio Prime Membership | Hidden Truth

Jio Prime T & C: Hi There and Welcome to The Protech today I'll be showing you some t& c of Jio Prime Membership which you all aren't aware of. We all doesn't waste our time to Read this but I have selected some main points which you need to know. 
Main Points of Jio Prime Membership which you need to know:
1. Post 31st March, 2017, if you have not recharged with any plan Minimum of Rs 149 Plan, your services will stop even if you are Jio Prime . You will be able to get incoming voice calls and SMS for certain period.

Amazon Prime Video – Subscribe for Free trial And Get Rs. 200 Amazon Pay Balance

Amazon Prime Video :-Amazon Recently launched Amazon Prime video  in india . Amazon prime Video is A website which Provide you all Latest, Famous ,exclusive TV shows as well as award-winning Amazon Originals.You Can also watch popular US Tv Episodes Series online By subscribing amazon prime video .You can feel True HD For Latest movies
In addition to unlimited streaming, your Prime membership includes FREE One-Day and Two-Day delivery on eligible items on Amazon.in, early access to deals and more – at an introductory price of Rs 499/year.

500 Internal Server Error

How to fix a 500 Internal Server Error
The 500 Internal Server Error is a very general HTTP status code that means something has gone wrong on the web site's server, but the server could not be more specific on what the exact problem is.

Are You the Webmaster? See Fixing 500 Internal Server Error Problems on Your Own Site towards the bottom of the page for some better advice if you're seeing the 500 Internal Server Error on one or more of your own pages.
The 500 Internal Server Error message might be seen in any number of ways because each website is allowed to customize the message.

Here are several common ways that you might see the HTTP 500 error:

Yahoo Disables Email Auto-Forwarding; Making It Harder for Users to Move On

Yahoo! has disabled automatic email forwarding -- a feature that lets its users forward a copy of incoming emails from one account to another.
The company has faced lots of bad news regarding its email service in past few weeks. Last month, the company admitted a massive 2014 data breach that exposed account details of over 500 Million Yahoo users.
If this wasn't enough for users to quit the service, another shocking revelation came last week that the company scanned the emails of hundreds of millions of its users at the request of a U.S. intelligence service last year.
That's enough for making a loyal Yahoo Mail user to switch for other rival alternatives, like Google Gmail, or Microsoft's Outlook.

How to Run Multiple WhatsApp Account on Your Android Phone (Two WhatsApp in One Phone)

WhatsApp is one of the most popular and commonly used Instant messaging apps these days and due to its simplicity and Easy to Use interface, users are able to use it without any hassle.
By now, everyone of us has WhatsApp in our smartphones. Although each and everything is quite handy in WhatsApp, "What's the most disturbing part that you came across?"
For me it is:
How to use two WhatsApp account in one single mobile phone?


If you run dual SIM in your mobile phones, you might be willing to enjoy two separate WhatsApp account for your two different telephone numbers. Isn't it?
However, this is where WhatsApp puts limitations on its users. WhatsApp users can not use more than one WhatsApp account on their mobile devices.
You are probably wondering:
"How do I find an excellent solution to this problem that actually works?"

Today, I am introducing you not one but multiple solutions to your problem that will allow you to run two WhatsApp accounts in one phone.

12 Interesting Computer Facts

Friends today we will highlight 12 interesting computer Facts that you might not be knowing it before,
lets see them now.
 1)Over 6,000 new computer viruses are released every month.

2)The first computer mouse, constructed in 1964, was made out of wood.(by Doug Engelbart)

3)The average human being blinks 20 times a minute – but only 7 times a minute when using a computer.

4)The first electro-mechanical computer was developed in 1939.

TRAI recommends one bill for all services virtual network operator

The Telecom Regulatory Authority of India (TRAI) recommended to the government creation of a virtual network operator (VNO), a new telecom service provider that would work like a reseller for telecom operators and bill directly to customers.

According to the recommendation, a VNO would offer all telecom services permitted under new licences.

“Since VNOs are a new concept in India, initially, the duration of the licence of a VNO should be fixed at 10 years, extendable further for 10 years at a time by the licensor,” TRAI said.

Disabling 'Find My iPhone' on iOS 7 without any Password


iOS devices have a feature called 'Find My iPhone', allows device owner to locate their stolen devices using linked Apple ID with iCloud Account.
Unfortunately, a security flaw in iOS make it possible to turn off Find My iPhone without a password and enabled thieves to bypass the protection which makes the iPhone untraceable if lost or stolen.
To Set-Up 'Find My iPhone' feature, users need to link their Apple ID with it and this will not only helps in locating the device but also gives permission to its user to remove all the data, drive direction to the lost device, lock the device by a passcode and displays a custom message on the locked screen.
KILL 'Find My iPhone' WITHOUT APPLE PASSWORD
Normally, disabling Find My iPhone requires Apple ID password, but according to the vulnerability reported by Miguel Alvarado, a thief can bypass all of this security feature without knowing your Apple account's password.
In a video demonstration on iOS 7, he explained that just by tapping the “Delete Account” in the iCloud settings panel and switch the “Find My iPhone” to off mode simultaneously, one can easily remove the iCloud account without any password authentication.


But doing so is not that much easy as it actually looks, a novice has to perform this a number of times to get this done.
After Doing so, just connect the hacked iPhone with your computer and use iTunes software to restore the smartphone's Data.
Similar flaw was disclosed in February this year allows anyone to disable 'Find My iPhone' on iOS 7.0.4 devices.
HOW TO PROTECT YOUR iPHONE
The the vulnerability is totally irrelevant if you have a passcode on your iPhone. Apple will release a fix as soon as possible, until then users are advised to keep a secure passcode with a very short timer, that prevents anyone from getting into the iCloud settings at all.

Stratasys launches multi-material colour 3D printer

                      The new $330,000 printer is targeted at industrial designers and manufacturers
The world's first multi-material full-colour 3D printer has been launched by Stratasys, the owner of the MakerBot range of printers.

It features "triple-jetting" technology that combines droplets of three base materials, reducing the need for separate print runs and painting.

The company said the Objet500 Connex3 Color Mutli-material 3D Printer would be a "significant time-saver" for designers and manufacturers.

Hack Windows using winAUTOPWN 3.4 –Completing 4 years of windows hacking

winAUTOPWN has been an old favourite to automate windows hacking and vulnerability testing.  The project is the brainchild of Azim Poonawala of [C4]Closed Circuit Corporate Clandestine and saw its first release in 2009. Fast forward to 4 years; it has matured into a good exploitation framework with a plethora of options. As the Author states about it  -

Autohack your targets - even if you have consumed and holding a bottle of 'ABSOLUT' in one hand and absolute ease (winAUTOPWN) in the other.

In layman terms, winAUTOPWN is a unique exploit framework which helps in gaining shell access and pwning (aka exploiting vulnerabilities) to conduct Remote Command Execution, Remote File/Shell Upload, Remote File Inclusion and other Web-Application attacks. To add cherry on the top, it can also help in conducting multiple types of Denial of Service attacks on targets, furthermore, It can also be used to test effectiveness of IDS/IPS 

Shortcut Keys of Windows 8 (its time to speed up your workflow)


Using Shortcut keys is an integral part of your work if you want to do it fast. like in Ms word if you use shortcut keys (e.g. pressing CTRL+N for opening a file is fast than click on menus to accomplish  this task) it increases your speed of workflow dramatically. Same like in operating system, if you use shortcut keys definitely it increases your speed of work. So today I am going to share with you the shortcut keys of windows 8 (in case of windows8 shortcut keys becomes more handy because of introducing METRO and other features like quick search ) which superbly facilitate you to do your work faster than before. So let’s get started…

Windows XP Hangs At Shutdown Screen


Note: Before perform following steps you need to take backup 
start > run > type regedit > press enter > go to file menu > click on export> save in any place as you want like desktop or c:/

Step1: Open REGEDIT and navigate to ‘HKEY_CURRENT_USER\Control Panel\Desktop\’
Highlight the ‘WaitToKillAppTimeout’ value.
Set it to ‘1000′.
Now highlight the ‘HungAppTimeout’ value
Set it to ‘1000′ also.
The second part of this tip changes the same settings, this time for all users on the system.
Step2: Open REGEDIT and navigate to ‘HKEY_USERS\.DEFAULT\Control
Panel\Desktop’
Highlight the ‘WaitToKillAppTimeout’ value.
Set it to ‘1000′.
Now highlight the ‘HungAppTimeout’ value.
Set it to ‘1000′ also.

Another Hack Allows Access to Locked iPhones


A glitch in Apple's iOS 6.1 operating system makes it possible to access an iPhone's sensitive data, including contacts and photos, without entering the correct passcode, or personal identification number (PIN).
The security flaw, the second PIN bypass that security researchers have found this month, takes a bit of tricky button-pushing in a specific order. But once done successfully, it allows an intruder to download the phone's data over USB to a computer that would have otherwise been locked out.

5 best free sites to find any software’s serial key


Softwares form core part of our computer systems. Most of the useful softwares require serial key for their smooth functioning and it is always a tough job to findsoftware serial key for free. Cracks are available on web which help in bypassing thislicense key prompt. But, many a times, such cracks are infected with viruses. So, it is always a better idea to find serial keys. So, I have provided a list of 5 best sites which you can use to find any software’s serial key.
Find software serial key:
Check the list below for the best sites to find any software’s serial key. To find your favorite software’s serial key, simply enter the software name in search box at these sites and you will get lots of serial keys compatible with your software.


[Update] IDM 6.11 with serial key free download full crack patch and keygen Latest version 2012

Internet Download Manager is a download accelator. By using this software we are able download from the Internet at a high speed.But when we are downloading the software from its official site it is not a full version. That is a 30 day trial pack. After these days are past it will ask you to enter serial key or to buy. So here is the process to make any latest downloaded IDM full version.After making this it will be registered for lifetime and not ask to register it further.

Here I will describe how can we make an latest IDM full version using some serial keys and adding some tricks.

Download Link: http://www.internetdownloadmanager.com/download.html

Otherwise download any version of idm and make it full version from the below process by using the serial keys and some simple changes in the hosts file.

Process:

1. Download the latest version IDM from here and install it.

2. Navigate to "C:\Windows\System32\drivers\etc" on your computer.

3. In the "etc" folder you will find a file with name "hosts"

4. Now right click on the Hosts file and choose "properties" and Navigate to "security" tab on the property window.

5. Now click on "Advanced" and Navigate to "owner" tab on the Advanced Security Option.

6. Click on "edit".

7. A new window will be opened. There you will find a table asking for "change Owner to". Now change there to your local user on which you logged on.(e.g. USER-PC or anything on your system. Not the Administrator user)

8. Below that you will find an check box "replace owner on sub containers and objects".

9. Just tick the check box.

10. Now apply all the modified setting. During apply the changes it will show an message "You dont have the permission to read the file or the contents of the directory. Do you want to change the permission of the file or folder to full control. All permission will be replaced if you press ok". Just Ignore the message and press OK.

11. Now again Right click of mouse onthe "Hosts" file and choose "properties" then Navigate to "security" tab.

12. Now click On "Edit" on the "Group or User Names" section.

13. A new window for permission will be opened.In the permission window choose the logged or local user and in the "Permission For User" tab tick on "Full Control".

14. Now apply those changes. And click on "ok"

15. Now open the "Hosts" file with notepad and Copy the below bold letters and paste it in the hosts file.


127.0.0.1 tonec.com

127.0.0.1 www.tonec.com

127.0.0.1 registeridm.com

127.0.0.1 www.registeridm.com

127.0.0.1 secure.registeridm.com

127.0.0.1 internetdownloadmanager.com

127.0.0.1 www.internetdownloadmanager.com

127.0.0.1 secure.internetdownloadmanager.com

127.0.0.1 mirror.internetdownloadmanager.com

127.0.0.1 mirror2.internetdownloadmanager.com


16. Now save the hosts file.

If you are facing any difficulty in saving the hosts file then you see the how to take ownership of a file.

Because, without taking the ownership we will not be able to modify the hosts file.

17. Now open Your Installed IDM application. Click on "registration" on the menubar and choose "Registration".

18. When you click on registration, Now a new window Will be open ask your First Name, Last Name, Email Address and Serial Key.

19. Enter your First name, Last Name, Email address in the required field. In the serial key field enter any of the following given below


RLDGN-OV9WU-5W589-6VZH1

HUDWE-UO689-6D27B-YM28M

UK3DV-E0MNW-MLQYX-GENA1

398ND-QNAGY-CMMZU-ZPI39

GZLJY-X50S3-0S20D-NFRF9

W3J5U-8U66N-D0B9M-54SLM

EC0Q6-QN7UH-5S3JB-YZMEK

UVQW0-X54FE-QW35Q-SNZF5

FJJTJ-J0FLF-QCVBK-A287M

20. And click on ok to register. that is it. Now your latest IDM become full version with the registration.

Enjoy and cheers...................

 
Design by gitstein | Bloggerized by Kuldeep