Showing posts with label tips n tricks. Show all posts

Microsoft is finally retiring Internet Explorer in 2022

 Internet Explorer will no longer be supported in June 2022


Microsoft is finally retiring Internet Explorer next year, after more than 25 years. The aging web browser has largely been unused by most consumers for years, but Microsoft is putting the final nail in the Internet Explorer coffin on June 15th, 2022, by retiring it in favor of Microsoft Edge.

“We are announcing that the future of Internet Explorer on Windows 10 is in Microsoft Edge,” says Sean Lyndersay, a Microsoft Edge program manager. “The Internet Explorer 11 desktop application will be retired and go out of support on June 15, 2022, for certain versions of Windows 10.”

While the Long-Term Servicing Channel (LTSC) of Windows 10 will still include Internet Explorer next year, all consumer versions will end support of the browser. Microsoft doesn’t make it clear (and we’re checking), but it’s likely that we’ll finally see the end of Internet Explorer being bundled in Windows either in June 2022 or soon after.

Internet Explorer originally launched in 1995

The alternative for most businesses will be Microsoft Edge with IE mode. Microsoft created its IE mode for Edge a couple of years ago, and it has allowed businesses to adopt the new Chromium-based browser for older legacy websites. IE mode supports older ActiveX controls and legacy sites, which are surprisingly still used by many businesses. Microsoft is promising to support this IE mode in Edge until through at least 2029.

The end of Internet Explorer has been a long time coming. Microsoft ended support for Internet Explorer 11 for the Microsoft Teams web app last year, and it’s planning to cut it off from accessing Microsoft 365 services later this year. Internet Explorer 11 will no longer be supported for Microsoft’s online services like Office 365, OneDrive, Outlook, and more on August 17th.

Microsoft has also been trying to stop people from using Internet Explorer for more than five years. Microsoft Edge first appeared in 2015, and it kicked off the end of the Internet Explorer brand. Microsoft has since labeled Internet Explorer a “compatibility solution” rather than a browser and encouraged businesses to stop using the aging browser in favor of Edge and its IE mode.

How To Fix The Memory Management Error In Windows 10

 Memory_Management  is one of the most unhelpful phrases that Microsoft suggests you search for if you run into a BSOD (Blue Screen of Death) error while running Windows 10. So, how do you fix the memory management issue?

Window 10

The first step in fixing any computer problem is isolating the issue’s source, so you know what to fix. With Window’s ominous errors, such as this one, it may be challenging to know where to begin.

Basic troubleshooting is essential to finding your memory management error. Let’s take a look at what you can do to get this fixed.

Step 1: Run Windows 10 in Safe Mode

The first thing you should do is launch Windows 10 in safe mode with basic drivers. This action allows you to check whether you still receive the BSOD Memory Management error. Essentially, this shuts down any processes the computer doesn’t need. If the memory management error ceases, you’ll know it isn’t hardware but rather something in the software, such as a patch in an update or a driver. If the problem still occurs, you may need to replace some faulty hardware. To boot your system in Safe Mode, follow the steps below.

  1. Use the Win+R keyboard shortcut and type “msconfig“ without quotes, then hit “enter.”

Run Command

    2.    Tap the “Boot” tab in the upper section of the screen.

    3.Select “Safe Boot.”


    4.Choose “Minimal” from the list of boot options.


Step 2: Run Windows Memory Diagnostic

The Windows Memory Diagnostic tool will test your SDRAM and report any problems it finds—if any at all. This step should use Safe Mode to prevent the BSOD issues you experience. However, this requirement is after affirming that your PC worked correctly in Safe Mode using Step 1 above.

  1. Press the “Windows + R” keyboard combination and type “mdsched” without quotes, then press “Enter” or click “OK.”

     2.Select the option to restart and run a check for SDRAM problems.


Upon restart, you will receive a report letting you know if you’re having a memory issue.

As the name suggests, the memory management error relates to the computer’s memory, which can be a physical problem with the installed RAM. The Windows Memory Diagnostic Tool can help discover if this is the root of the problem.

When Windows restarts, it will tell you if there is something wrong with your memory. If there is, then you’ll have to either replace the RAM yourself or send back your computer if it’s under warranty.

Step 3: Run SFC Scanner
SFC Scanner is a Microsoft tool for detecting various problems with your system, and running it seems to have solved some people’s memory management woes. Once again, this step should also be performed in Safe Mode like Step 1 and Step 2 above.

  1. In the Cortana search bar, type “cmd” without quotes, then click on “Run as administrator” in the right panel for the Command Prompt. You can’t use the right-click Start Menu option anymore since Powershell replaced Command Prompt.

    2.Once the Command Prompt opens, type “sfc/scannow” without quotes and press “Enter.”

SFC Scanner will now run through your system, seeing if it finds any disk errors to fix. Even if it doesn’t find anything, some users have found that their computers play nicer after a full scan.

Note: It is best to perform two or three rounds of scanning since the process doesn’t always detect anything on the first attempt or fixes something else and needs to find more issues.

Step 4: Look for Software Problems
Software problems are a little more challenging to pin down. Still, if the memory management error is a relatively new phenomenon, you could try undoing some of your recent software installations to see if it fixes the problem.

Specific pieces of software often link to memory management errors. You can try disabling and re-enabling newer software to see if that fixes the BSOD, or you can reload Windows 10 entirely (although this is a nuclear option).

Isolating and correcting a software issue or even a corrupted file can take a while, but it’s certainly worth it if you’re not entirely sure you’re experiencing a hardware failure.

Step 5: Update Your Graphics Card Drivers
One of the most common causes of the memory management error in Windows 10 is outdated or broken graphics card drivers. This scenario makes sense, especially since the graphics card has memory too. If you’re not running the latest version, try installing the newest available.

If you already have the latest drivers, try the “uninstall/reinstall” method. Sometimes, a driver is broken or corrupt but goes undetected. The drivers you need will depend on your graphics card, of course. Windows 10 will be able to tell you what you have in your system, but it’s likely to be onboard Intel graphics or something from Nvidia or AMD. External video cards have more memory than onboard graphics, and they are more prone to overheating.
Graphic Information

Visit the website of the manufacturer and download any updates to get your system working correctly again.

Step 6: Upgrade Your PC’s Hardware
Depending on the results of your troubleshooting adventures, it may be time to upgrade some of your system’s hardware. As software and PC technology progress, so does hardware requirements.

Before rushing out to buy new hardware, check to ensure that everything in the case is seated correctly. Perhaps you recently moved your machine, and something came loose, or your hardware could use a thorough cleaning.

If it’s a machine that you’ve built or one that is out-of-warranty, it’s time to look for new components to get your computer up and running again. It may be an opportunity for a new graphics card, or you may need more RAM. Whatever the case, if you’ve tried everything above and the issue persists, it’s likely hardware-related.

Git vs. SVN: Which version control system is right for you?

 Version control systems are integral to building software. They combine your repository of project files with a history of all your code changes, making it easy to edit and understand your code over time.

The main benefit of using a version control system is that it keeps your team’s workflows organized as they work through various types of releases. With one in place, team members can easily research, track, and undo code. They can work on the same code simultaneously without code conflicts. Plus, the whole team can track who made what changes, when, and why.

But before you implement a version control system into your team’s workflow, you need to figure out which one is right for you. While most options out there have similar benefits, their differences are important.

Git vs. SVN version control systems

With all version control systems, project files sit on a server that you push your files to when you have completed your work on your local machine. However, deciding whether to use a centralized version control system (like SVN) or a distributed version control system (like Git) will affect how you commit changes.

Remember, not all version control systems fit all teams and all needs. A method that works perfectly for one company may be entirely wrong for your team. To determine which system to use, you need to look at how each system works.

What is SVN?

Apache Subversion, also known as Subversion, SVN represents the most popular centralized version control system on the market. With a centralized system, all files and historical data are stored on a central server. Developers can commit their changes directly to that central server repository.

Work is comprised of three parts:

  1. Trunk: The trunk is the hub of your current, stable code and product. It only includes tested, unbroken code. This acts as a base where all changes are made from.
  2. Branches: Here is where you house new code and features. Using a copy of the trunk code, team members conduct research and development in the branch. Doing so allows each team member to work on the enhanced features without disrupting each other’s progress.
  3. Tags: Consider tags a duplicate of a branch at a given point in time. Tags aren’t used during development, but rather during deployment after the branch’s code is finished. Marking your code with tags makes it easy to review and, if necessary, revert your code.

Here’s how this process looks: To create a new feature you first branch the code from the trunk, i.e. take an exact copy of the trunk and place it into a new folder within the branches area. Then you work on your feature. When you’re done, you merge your changes back into the trunk.

The benefit of branching is the ability to make commits into the branch without breaking the trunk. You only merge into the trunk when your code is error-free. This keeps your trunk stable. And users generally appreciate how easy it is to use and understand SVN.

However, working on one central server means there is a single point of failure. If there is an error, it can destroy all builds. Limited offline access is also a frequent point of complaint.

What is Git?

While centralized systems were the version control system of choice for nearly a decade, Git has surpassed them in recent years.

Unlike SVN, Git utilizes multiple repositories: a central repository and a series of local repositories. Local repositories are exact copies of the central repository complete with the entire history of changes.

The Git workflow is similar to SVN, but with an extra step: to create a new feature, you take an exact copy of the central repository to create your local repository on your local machine (you can think of this as your “local trunk”). Then you work on your local repository exactly as you would in SVN by creating new branches, tags, etc. When you’re done, you merge your branches into your local repository (i.e. local trunk). When you’re ready to merge into the central repository, you push your changes from your local repository to the central repository.

Many people prefer Git for version control for a few reasons:
  1. It’s faster to commit. Because you commit to the central repository more often in SVN, network traffic slows everyone down. Whereas with Git, you’re working mostly on your local repository and only committing to the central repository every so often.
  2. No more single point of failure. With SVN, if the central repository goes down or some code breaks the build, no other developers can commit their code until the repository is fixed. With Git, each developer has their own repository, so it doesn’t matter if the central repository is broken. Developers can continue to commit code locally until the central repository has been fixed, and then they can push their changes.
  3. It’s available offline. Unlike SVN, Git can work offline, allowing your team to continue working without losing features if they lose connection.

Teams also opt for Git because it’s open source and cross-platform. That means that support is available for all platforms, multiple sets of technologies, languages, and frameworks. And it’s supported by virtually all operating systems.

There is one con teams find frustrating: the ever-growing complexity of history logs. Because developers take extra steps when merging, history logs of each issue can become dense and difficult to decipher. This can potentially make analyzing your system harder.

Alternatives to Git

Git vs. GitHub

Although similar in name, Git and GitHub offer very different services. While Git allows users to make edits and make changes to and track their repository of code, GitHub is a cloud-based host that allows you to upload and manage Git repositories in an open-source format.

By managing a project in GitHub, all of your team can make edits simultaneously without affecting the trunk. Users can copy the code from GitHub to their local machines to test and make edits. In order to reintegrate a branch back into the trunk, the user must push or pull the changes from their local machine. And, if you’re working on an open-source project, anyone using GitHub, on your team or otherwise, can create branches to make edits on the Git uploaded to the hosting platform. In this way, the code is shareable to others who may be working on similar projects.

Git vs. Perforce

While Git and Perforce offer many of the same benefits, there are still a number of differences that make one better suited than the other depending on the team.

  1. Git is decentralized, or distributed. This means that to edit, developers download the source code onto their local machines to work and make edits, while Perforce is centralized, meaning all developers are making edits to one master branch kept on a server and accessible to all team members.
  2. Git is focused on code. While both store and track code in trunks and branches, Perforce also stores non-code assets. If developers are working with graphics, binaries, or other elements, Perforce can store these elements just like the code repositories.

So, the more non-code based assets developers are working on and the more geographically sprawled they are, Perforce becomes a better and better option. However, Perforce does not allow for multiple developers to work on the same code and conduct changes all at once.

Git vs. TFS

Like Perforce, TFS (also known as TFVC) is a centralized version control system (CVCS). So there is one version of code stored in a main server that all developers on a team can view and work on at a single point in time. Working on solely a centralized version of the build increases the chances of breaking the trunk with a small error since it can’t be committed and tested on a local machine before reintegrating. It also increases the chance of losing work along the way if your local machine or the central server goes down or has an issue.

Git vs. Mercurial

Git and Mercurial offer largely similar functionality, but with a few key differences. Both Git and Mercurial are decentralized version control systems (DVCS), so both allow multiple developers to be working on the same source code downloaded to their local machines at the same time and reintegrate commits as changes are made and tested.

Unlike Git, however, Mercurial permanently stores each branch into commits, making it impossible to remove or edit past work, making it more likely for the trunk to fail if bugs are pushed to production. For this reason and the enhanced number of options available in Git, more experienced, professional developers with choose Git over Mercurial every time.

In conclusion

Whether your team uses Git, SVN, or another alternative, you’ll benefit from being able to track and review your code for better releases. Just be sure to choose an issue tracking software that supports your choice, so you’re able to properly track that work over time.

How to Capture a Scrolling Screenshot in Windows 10


Scrolling image

Windows 10 offers many ways to capture a screenshot. To take a screenshot, all you need to do is press Ctrl + PRTSC or Fn + PRTSC and you instantly have a screenshot. There is even a built-in Snipping Tool that allows you to capture a section of a window as well as pop-up menus.

But all those methods only allow you to capture content that is within the dimensions of the browser’s viewing area. What if you want to capture a screenshot of a scrolling window of a webpage, document, or any other content that’s beyond the viewable area? In such cases your only option would be to use a third-party application

In this post you’ll learn the best tools to capture a scrolling screenshot in Windows.
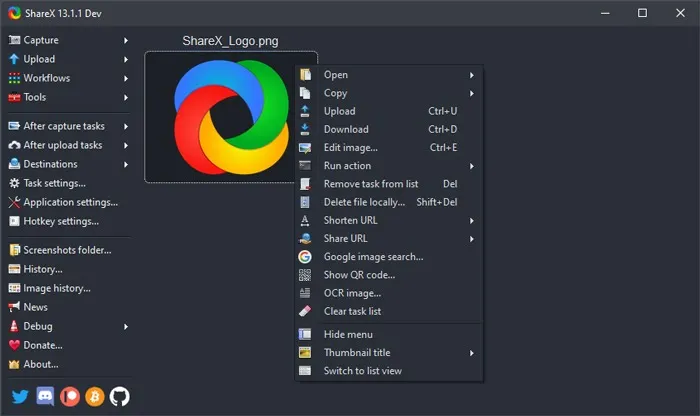
1. ShareX

Available to buy on its own website as well as the Steam gaming platform (where it has “Overwhelmingly Positive” reviews, as well as having its own well-populated Discord channel, the free screen capture app ShareX is validated by its broad popularity in the discerning game-streaming community.

ShareX

The open-source app is widely used by gamers for its robust screen-capture options. Among those features – which include video capture, GIFs, region-select, workflows, as well as a huge number of filters and effects to add to your captures – is the “scrolling screenshot” option you’re looking for here.

Just open ShareX, click Capture then “Scrolling capture”. Once you select your region, you can specify which window you want to scroll, whether you want there to be a delay before the screen-capture starts, and how many scrolls you want to capture.

It’s nice and easy to use, and unlike other options on this list it’s free without caveats, maintained as it is by a diligent community of open-source developers. Beyond just scrolling, it also functions as an all-in-one screen capture suite, which is pretty impressive given its small file size.
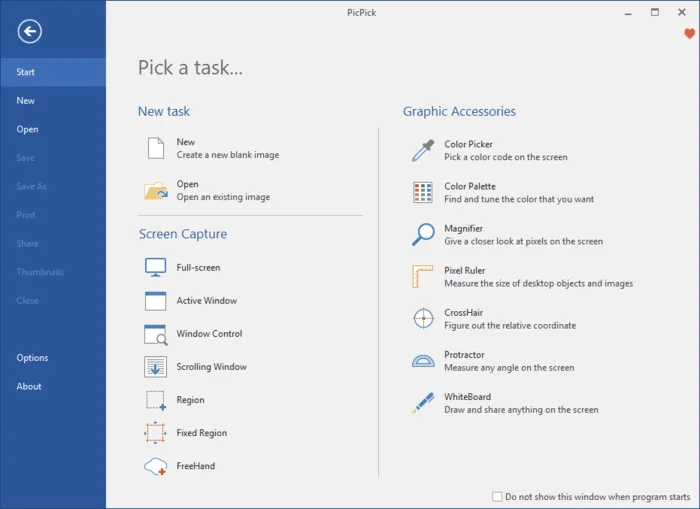
2. PicPick

PicPick is a robust screen-capture and image-editing software developed and owned by NGWIN. It’s my personal favorite screen capture tool, and I use it all the time. The best thing about PicPick is that it’s free for personal use and packs some cool features you won’t find even in the paid programs.

PicPick

As far as screen capture is concerned, PicPick offers seven screen capture modes: Full screen, Active Window, Window Control, Scrolling Window, Region, Fixed Region, and FreeHand. Each of these modes suits different scenarios and can help you customize your screenshots to your liking. For example, the Region mode can help you to isolate and capture a dialogue box without background noise.

Fixed Region mode allows you to set your desired screenshot length and width in terms of pixel count which helps to ensure all your screenshots are uniform. It also has a Scrolling Window mode that lets you capture a scrolling screenshot of a webpage or a document in just a few clicks.

PicPick Options

To capture a scrolling window, follow the steps below:

1. Press and hold Ctrl + Alt together, then press PRTSC. A rectangular box highlighted in red will appear.

2. Press and hold the left mouse button, then drag the mouse on the scrolling window to select the area.

3. Release the mouse click and an auto-scroll will happen slowly. After that, your entire window will be captured in just a few seconds.

PicPick also comes with a pixel ruler which can be used to measure the size of images that are displayed on your screen, a virtual whiteboard that allows users to draw on the screen, and crosshairs for pinpointing the positions of relative pixels.

3.Snagit

Snagit is a popular screenshot-capture and video-recording software created and distributed by TechSmith. It features a sleek interface that is more focused than PicPicks.

Snagit
    

It also boasts of superior image-editing functionalities that are more polished than those of PicPicks. However, Snagit is not free and costs $50 per license, which is relatively high.

Because the main focus of Snagit is on screenshot capture, it comes with advanced screen capturing and editing features that blow the competition out of the water. For example, it has a Panoramic Capture feature that allows you to capture just a portion of a scrolling Window.

Capturing a scrolling window on Snagit is also easier and more user-friendly. All you have to do is navigate to the all-in-one-tab and click the “Capture” button. Then click on the yellow arrows depending on the direction you want to scroll. Snagit will capture everything visible on the window and create a single image that you can edit. Here’s a short video on how to capture a scrolling screenshot with Snagit.

Besides capturing screenshots, Snagit can also record screen activity. Its superior editing features also make it the best tool for creating tutorials.

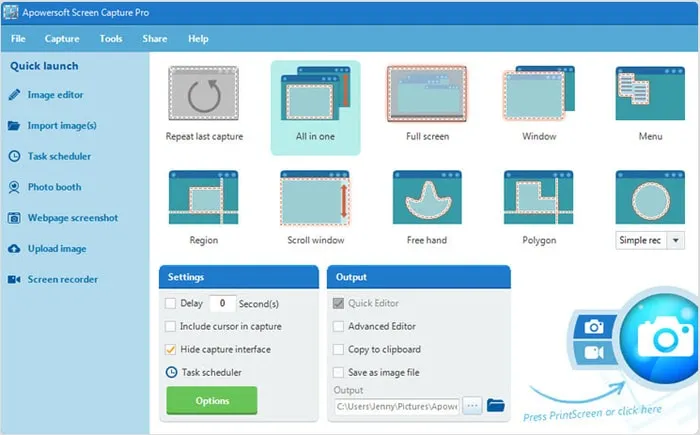
4. Apowersoft Screen Capture Pro

Apowersoft Screen Capture Pro is an innovative and highly-customizable screenshot-capture and image-editing tool. The program leaves no stone unturned when it comes to screenshot capturing, thanks to its ten screenshot modes, which includes Scrolling screenshots, Menu, and Freehand, just to mention a few.

Apowersoft

The scrolling Window capture mode allows you to capture an entire webpage, document, or browser, including contents hidden from the viewer. It also comes with a “Task Scheduler” that you can also use to take automatic screenshots.

In addition to screenshot capturing, Apowersoft Screen Capture Pro comes with a robust image editor which provides a wealth of options for you to edit your screenshots. What’s more, you can also use this tool to record the screen, upload, and share online. However, the program is quite expensive. A lifetime license goes for $79.95. You can also opt for monthly subscriptions starting from $12.95 per month.

5.GoFullPage - Full Page Screen Capture

Capture a screenshot of your current page in entirety and reliably—without requesting any extra permissions! -GoFullPage

The simplest way to take a full page screenshot of your current browser window. Click on the extension icon (or press Alt+Shift+P), watch the extension capture each part of the page, and be transported to a new tab of your screenshot where you can download it as an image or PDF or even just drag it to your desktop.

*No bloat, no ads, no unnecessary permissions, just a simple way to turn a full web page into an image.*

The advanced screen capture technology handles complex pages—including inner scrollable elements as well as embedded iframes—unlike any other extension. If you encounter an issue, please report it via the customer support flag icon on the capture page, so we can improve the extension for you and everyone else who uses it.

Knowing how to capture scrolling screenshots can be of great use to you, especially if you’re looking into creating some instructional content. Scrolling screenshots can also come in handy when you want to report software issues, as you’ll be able to point out the issues clearly.

7 Ways to Connect Android Phone to TV


Hey guys, Today in this post I’ll tell you, 7 Ways to Connect Android Phone to TV. Sometime this thought comes in your mind that if you can connect your android phone with your TV and can play music, songs, videos or games on it but many people are not knowing that it can be done so easily. Display of our android phone is much smaller. So that, we aren’t able to enjoy games and videos on it but if we can watch it on the screen of our TV then it will be much more enjoyable than that of watching it on mobile screen. If smart or non smart TV is there at your home then you can connect your android phone with your TV and watch your mobile screen on TV. Connecting android phone to TV is very simple only you should know how to connect it.  
Connect Android Phone To TV
Now the most important thing is that if you have TV in your house then what kind of is smart or non-smart? Because if you have smart TV then you can connect your android phone to TV with wifi without any wire. But if you have a non-smart TV then you have to use the wire to connect them. Means smart TV and non-smart TV have different ways of connecting with android phone. In today’s post, we are going to tell you about the two types of method, which can help you connect with your android phone to TV. After reading this post, you can connect any kind of TV to your android phone. There are many types of way to connecting them.

Bitcoin fraud: How investors lost Rs 22,000 crore

Bitcoin fraud: How investors lost Rs 22,000 crore
It was too good a deal — earn 1% daily interest and double your money in 100 days. Too good to be true, hordes of rich investors in Gujarat realised a year later when the BitConnect platform folded up after pocketing roughly Rs 22,000 crore of their money in Bitcoin.
For many, it was a double whammy after the jolt of demonetisation. In fact, the Bitcoin craze had started in the state as people looked for safe ways to launder their piles of black money after November 2016.
“The transactions were anonymous, it did not require any proof, and best of all, it could be operated from anywhere in the world. A cryptocurrency boom started overnight,” Sunny Vaghela, CTO of an Ahmedabad-based IT firm, told TOI. Surat became the trade’s hub with numerous ‘equity brokers’, who juggled different cryptocurrencies for maximum profit.

Flipkart Plus to launch on August 15: Features, subscription fee and more

Flipkart Plus to launch on August 15: Features, subscription fee and more
Flipkart is all set to launch Amazon Prime rival in India. Called Flipkart Plus, the loyalty programme will go live this Independence Day (August 15). "On Independence Day, reward yourself with a slew of benefits as Flipkart launches Flipkart Plus, a one-of-a-kind no-fee customer benefits program with a wide range of benefits and rewards. And absolutely no strings attached," says the company on its website. This is Flipkart's second attempt at loyalty programme.
The Flipkart Plus loyalty programme will reportedly offer Flipkart customers a range of benefits and rewards. Here are all the details about Flipkart Plus: features benefits it will offer to customers and more.

Facebook launches Digital Literacy Library to help young people use the internet responsibly


There are more young people online than ever in our current age of misinformation, and Facebook is developing resources to help youths better navigate the internet in a positive, responsible way. Facebook has launched a Digital Literacy Library in partnership with the Youth and Media team at the Berkman Klein Center for Internet & Society at Harvard University. The interactive lessons and videos can be downloaded for free, and they’re meant to be used in the classroom, in after-school programs, or at home.

Created from more than 10 years of academic research and “built in consultation with teens,” the curriculum is divided into five themes: Privacy and Reputation, Identity Exploration, Positive Behavior, Security, and Community Engagement. There are 18 lessons in total, available in English; there are plans to add 45 more languages. Lessons can be divided into three different age groups between 11 and 18, and they cover everything from having healthy relationships online (group activities include discussing scenarios like “over-texting”) to recognizing phishing scams.


The Digital Literacy Library is part of Facebook’s Safety Center as well as a larger effort to provide digital literacy skills to nonprofits, small businesses, and community colleges. Though it feels like a step in the right direction, curiously missing from the lesson plans are any mentions of “fake news.” Facebook has worked on a news literacy campaign with the aim of reducing the spread of false news before. But given the company’s recent announcements admitting to the discovery of “inauthentic” social media campaigns ahead of the midterm elections, it’s strange that the literacy library doesn’t call attention to spotting potential problems on its own platform.


Facebook has started internal testing of its dating app


Two months after announcing the product at its F8 developer conference, Facebook is testing its dating product internally with employees. Independent app researcher Jane Manchun Wong, who regularly uncovers new Facebook features by scouring the source code, found evidence of the product Friday and posted it on Twitter. The company confirmed to The Verge that the product is in testing within the Facebook app but declined to comment further.

How to Recover Deleted WhatsApp Images/Pictures from Android and iOS Devices

Today i got a call from one of the important person of my life Preetveer Singh (a best friend cum brother) being facing a problem of whatsapp recovery as we all know WhatApp is an integral part of our everyday communication, and any lose of data is highly frustrating. Losing your WhatsApp images is like a nightmare. But surprisingly it happens more often than you know, and recovering these deleted WhatsApp photos is not easy unless you have a robust solution like a WhatsApp recovery software.
If you are struggling with data lost, then this article will definitely be a lifesaver. Go through this comprehensive guide to know how to recover deleted WhatsApp photos and other data for iOS and Android devices like a pro.
recover whatsapp images
I have came up with a few solutions for you-


Part 1: How to Recover Deleted WhatsApp images Selectively on iOS Devices
Part 2: How to Recover Deleted WhatsApp images Selectively on Android Devices
Part 3: How to Recover WhatsApp images from Auto-Backup

Ethereum-Solidity language syntax in Sublime

I personally like Sublime as a text-editor more compared with all other existing text editors (P.S thanks to Vinay Saini who recommended me to go with Sublime).Sublime is my default. Before taking on programming on blockchain, Ethereum’s EVM specifically, one needs some foundation of solidity language which the existing documentations make decent effort to explain. It is always there is add and expanded upon.

Since I personally like to use Sublime, following are the steps to add Solidity language syntax on Sublime text editor.

Step 1: Install Package Controls
Package Control is a package manager for Sublime Text 2, 3. Open Sublime’s console.

View -> Show Console
import urllib.request,os,hashlib; h = 'df21e130d211cfc94d9b0905775a7c0f' + '1e3d39e33b79698005270310898eea76'; pf = 'Package Control.sublime-package'; ipp = sublime.installed_packages_path(); urllib.request.install_opener( urllib.request.build_opener( urllib.request.ProxyHandler()) ); by = urllib.request.urlopen( 'http://packagecontrol.io/' + pf.replace(' ', '%20')).read(); dh = hashlib.sha256(by).hexdigest(); print('Error validating download (got %s instead of %s), please try manual install' % (dh, h)) if dh != h else open(os.path.join( ipp, pf), 'wb' ).write(by)

Step 2: Restart Sublime and Install Package

Restart Sublime after Package Control installation. Open the Package Control by:

|  Cmd + Shift + P

Type Install and choose:

|   Package Control: Install Package


Wait a few seconds before Sublime gives options of packages to install. Type ‘Ethereum’ and off you go.


Restart Sublime and get cracking.

Must Read this before Buying Jio Prime Membership | Hidden Truth

Jio Prime T & C: Hi There and Welcome to The Protech today I'll be showing you some t& c of Jio Prime Membership which you all aren't aware of. We all doesn't waste our time to Read this but I have selected some main points which you need to know. 
Main Points of Jio Prime Membership which you need to know:
1. Post 31st March, 2017, if you have not recharged with any plan Minimum of Rs 149 Plan, your services will stop even if you are Jio Prime . You will be able to get incoming voice calls and SMS for certain period.

Amazon Prime Video – Subscribe for Free trial And Get Rs. 200 Amazon Pay Balance

Amazon Prime Video :-Amazon Recently launched Amazon Prime video  in india . Amazon prime Video is A website which Provide you all Latest, Famous ,exclusive TV shows as well as award-winning Amazon Originals.You Can also watch popular US Tv Episodes Series online By subscribing amazon prime video .You can feel True HD For Latest movies
In addition to unlimited streaming, your Prime membership includes FREE One-Day and Two-Day delivery on eligible items on Amazon.in, early access to deals and more – at an introductory price of Rs 499/year.

Yahoo Disables Email Auto-Forwarding; Making It Harder for Users to Move On

Yahoo! has disabled automatic email forwarding -- a feature that lets its users forward a copy of incoming emails from one account to another.
The company has faced lots of bad news regarding its email service in past few weeks. Last month, the company admitted a massive 2014 data breach that exposed account details of over 500 Million Yahoo users.
If this wasn't enough for users to quit the service, another shocking revelation came last week that the company scanned the emails of hundreds of millions of its users at the request of a U.S. intelligence service last year.
That's enough for making a loyal Yahoo Mail user to switch for other rival alternatives, like Google Gmail, or Microsoft's Outlook.

How to Run Multiple WhatsApp Account on Your Android Phone (Two WhatsApp in One Phone)

WhatsApp is one of the most popular and commonly used Instant messaging apps these days and due to its simplicity and Easy to Use interface, users are able to use it without any hassle.
By now, everyone of us has WhatsApp in our smartphones. Although each and everything is quite handy in WhatsApp, "What's the most disturbing part that you came across?"
For me it is:
How to use two WhatsApp account in one single mobile phone?


If you run dual SIM in your mobile phones, you might be willing to enjoy two separate WhatsApp account for your two different telephone numbers. Isn't it?
However, this is where WhatsApp puts limitations on its users. WhatsApp users can not use more than one WhatsApp account on their mobile devices.
You are probably wondering:
"How do I find an excellent solution to this problem that actually works?"

Today, I am introducing you not one but multiple solutions to your problem that will allow you to run two WhatsApp accounts in one phone.

10 Data Recovery Tools You Can Download For Free [Windows]

It happens to the best of us. We are working on that very important file when suddenly disaster strikes. It accidently gets deleted, corrupted, the computer died or a number of unfortunate things that prevent you from gaining access to the file. What’s worse, you don’t have a backup and are in desperate need of those important files urgently.

Well, don’t fret as it is possible to recover those deleted files. When you delete a file, you don’t actually ‘delete’ it. The system marks the area the file resides as reusable, removing the file from its index. This means that there is a period where it is possible to restore the file. To help you with your deleted data dilemma, we have for you 10 free data recovery tools for Windows, which will help from simple file recovery to a total partition rescue.
1. PhotoRec

PhotoRec is a powerful command line recovery tool that can recover your lost data by bypassing the file system, perfect for when your computer can see the drive but cannot access it or for use on a formatted drive. The app will work on different drive formats other than the ones used by Windows, including those used on OS X, and is also available on multiple platforms.
[Download here]

2. Recuva
Recuva provides a number of tools and features that makes recovering your data easier. The app will deep scan your drives and with it, you can recover deleted data on your drive or from drives that are damaged or formatted. It has the ability to recover data that was accidently deleted from certain apps such as your email program or the temp folder of Microsoft Word, useful when the power cuts off and you haven’t saved your progress. If the options seem too overwhelming, there is a wizard to guide you through the process.
[Download here]

12 Interesting Computer Facts

Friends today we will highlight 12 interesting computer Facts that you might not be knowing it before,
lets see them now.
 1)Over 6,000 new computer viruses are released every month.

2)The first computer mouse, constructed in 1964, was made out of wood.(by Doug Engelbart)

3)The average human being blinks 20 times a minute – but only 7 times a minute when using a computer.

4)The first electro-mechanical computer was developed in 1939.

Intestine-inspired 3D printed fashion will hold glowing bacteria

Never mind ants in your pants, what about fluorescent bacteria? These 3D printed, over-sized knickers have been inspired by the human gastrointestinal tract and are designed to one day be filled with liquid containing two microorganisms – cyanobacteria and E.coli bacteria.

The designer, Neri Oxman at the Massachusetts Institute of Technology, describes it as a "wearable microbial factory". Oxman is experimenting with the idea of futuristic wearables that can do useful things such as produce consumables or give off scents. Although she has published designs for similar wearables in the past, this is the first time they have been 3D printed.

Pics and chat data are hackable on apps like Tinder and Grindr

Dating is all about exchanging information to find a match. But if you've ever used Tinder, Grindr or any popular dating app, your personal information may have gone further than you'd like.

A new study shows that it is easy to hack into popular dating apps like Tinder and Grindr to reveal email addresses, profile pictures and private messages.

Raymond Choo, an information security expert at the University of South Australia in Adelaide, and his colleagues created fake profiles on eight of the most popular dating apps in the Google Play store. They then tried to get the data, now supposedly private, back out of a Samsung Galaxy S3 phone by capturing network traffic and trawling the app's private directory.

 
Design by gitstein | Bloggerized by Kuldeep