Showing posts with label Troubleshoot. Show all posts

Configure or Turn Off DEP (Data Execution Prevention) in Windows

It can cause issues with some older third-party software

Data Execution Prevention (DEP) is one of those ‘blursed’ things. It’s a blessing most of the time when it does its job and doesn’t interfere, but cursed when it does interfere. 

Let’s look at DEP and how to configure it, or turn DEP off, depending on your needs.

What Is DEP & What Does It Do?
According to Microsoft, DEP is :
“…a set of hardware and software technologies that perform additional checks on memory to help prevent malicious code from running on a system.”  

Dell simplifies it a bit and tells us that DEP

“…can help protect your computer by monitoring your programs to make sure that they use system memory safely.”


What does that mean? There are certain areas in the computer’s memory which aren’t intended to have code running in them, but sometimes code does run there. 

Usually, the code that will run there is malicious. DEP will monitor those areas and if it sees something going on in those areas it will shut it down. If you want to get in-depth about how it works, read Microsoft’s detailed description of Data Execution Prevention.

So Why Does DEP Cause Problems?
Even today, computers are dumb. They cannot reason, they can only use the most basic of logic. Plus, that logic is put into them by humans so computers also get our mistakes put into them. 

Sometimes, good programs will wander off into the areas that DEP monitors and work in those spaces.


When this happens, DEP will sometimes shut the entire program down and let you know via an error message. But sometimes DEP will just cause the program to run very poorly and there won’t be anything obvious to tell you why. 

What Programs Have Problems With DEP?
Programs that conflict with DEP are typically older programs or built on old codebases. A lot of Enterprise Resource Planning (ERP) software is built on codebases that go back to the 1970s. There was no DEP then, so the program will go into areas that DEP patrols.

64-bit programs were created after DEP was well established, so they were developed to comply. Most programs that conflict with DEP will be 32-bit programs. 

Non-Microsoft programs that interact with Windows Services heavily or run their own Windows Services may be tripped up by DEP. If that is the case, the vendor will recommend to completely turn off DEP.

For the home user, old games that are 32-bit, and some emulators for playing even older games, are the most likely to conflict with DEP.

Old device drivers or drivers downloaded from unofficial sources may also trigger DEP errors. Only download drivers from the hardware manufacturer or Microsoft, and update your drivers regularly.

How Do I Know If DEP Is The Problem?
You may have to go into Event Viewer and sift through the logs for Event ID 1000. If you find one, it may look like this:

Event ID : 1000 - DEP Error : Generic host for Win32 servicesGeneric Host Process for Win32 Services - DEP : Application Error
Event Type: Error
Event Source: Application Error
Event Category: (100)
Event ID: 1000
 You may see other errors referencing things like:

  • 0xFC:ATTEMPTED_EXECUTE_OF_NOEXECUTE_MEMORY – occurs when a device driver is trying to run in memory. It may be a bad or outdated driver. You’ll want to update your drivers. 
  • STATUS_ACCESS_VIOLATION (0xc0000005) – occurs when programs are trying to run in DEP protected memory space.
How To Configure Or Turn Off DEP
In Windows 10, DEP defaults to the setting Turn on DEP for essential Windows programs and services only. Most of the time, this is sufficient. It means that the majority of your programs will be ignored by DEP. 

But if DEP helps protect the computer and it doesn’t have a performance hit, you may want to select Turn on DEP for all programs except those that I select. Then if you find a program that has a problem with DEP, we can add it as an exception. Let’s look at how to do that.
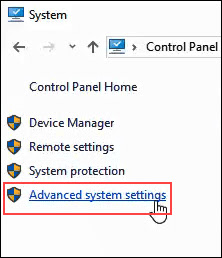
  • Open the Control Panel then open System.

  • On the left side of the System window, click on Advanced System Settings.
  • The System Properties window should open and already be set to the Advanced tab. In the Performance area, click on Settings.
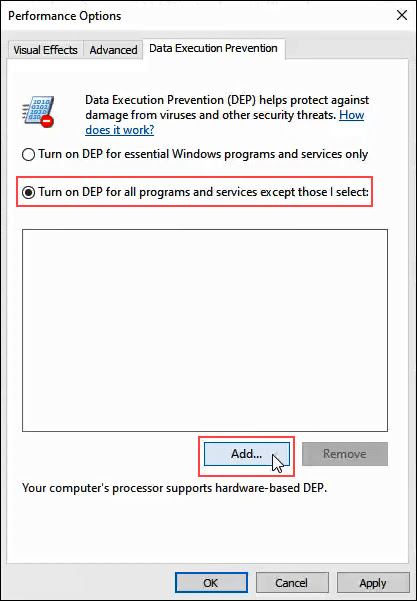
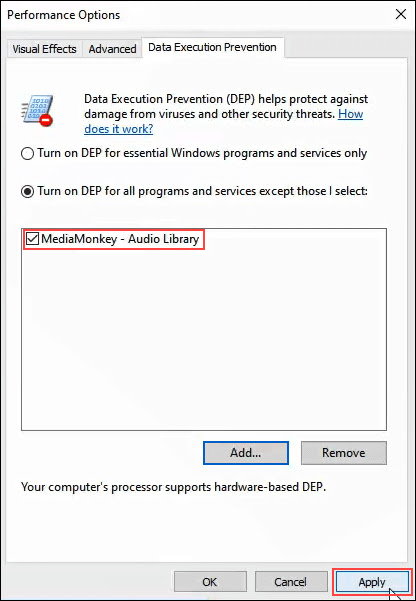
  • In the Performance Options window, click on the Data Execution Prevention tab.


  • With Turn on DEP for all programs except those that I select selected, click on the Add button near the bottom of the window.


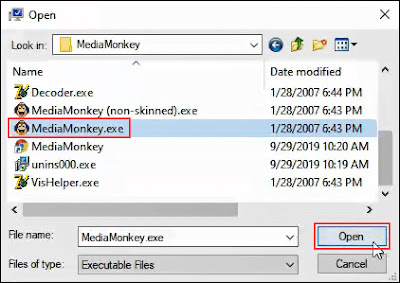
  • Navigate to the executable for the program that we’d like to add as an exception. It will most likely be in C:/Program Files (x86). 
  • In this example, we’re adding MediaMonkey, an old music player utility. Click on the .exe file once we find it and click on Open.


  • In Performance Options, click on Apply. Now, MediaMonkey will run outside of DEP protection while all others will run within DEP protection.

Turn DEP Completely Off

If you want to turn DEP completely off, we advise only doing that as part of troubleshooting an issue. DEP is there for your protection. 

Since it’s something that isn’t advised, there isn’t a good point-and-click way to do it. Let’s look at how we can turn off DEP.
  • Open the Command window as Administrator. Do this by typing cmd in the program search field near the Start menu.

  • Enter the command bcdedit.exe /set {current} nx AlwaysOff and press enter.


bcdedit.exe is a Windows utility for editing boot configuration data, hence     .

/set tells bcedit to set an option value entry in the boot configuration.

{current} tells becedit to work with the boot configuration being used right now.

nx is short for no execute and is the setting name for DEP in the boot configuration.

AlwaysOff is self-explanatory.
  • Restart the computer.
  • DEP will now be completely, and permanently off.

Turn DEP On For Everything
To turn DEP on for absolutely everything, the process and command is like above.

  • Open the Command window as Administrator, following the instructions in the procedure above.
  • Enter the command bcdedit.exe /set {current} nx AlwaysOn. 
        

  • Restart the computer.
  • DEP will be turned on and all programs monitored.
After turning DEP to being always on or always off, it CANNOT be changed via the Data Execution Prevention tab in system settings. 

Let’s look at how to change it so that the radio buttons in the DEP tab can be used again.

Set DEP Back To Default Behavior
To set DEP behavior back to default and make it manageable again via system settings, do the following.
  • Open the Command window as Administrator.
  • Enter the command bcdedit.exe /set {current} nx OptIn.

  • Restart the computer.
  • Now the radio buttons in the DEP tab in systems settings are accessible again.
To DEP Or Not To DEP
We recommend leaving DEP on its default setting of Turn on DEP for essential Windows programs and services only, unless it’s necessary to change it to troubleshoot problems that may be DEP-related.

Microsoft is finally retiring Internet Explorer in 2022

 Internet Explorer will no longer be supported in June 2022


Microsoft is finally retiring Internet Explorer next year, after more than 25 years. The aging web browser has largely been unused by most consumers for years, but Microsoft is putting the final nail in the Internet Explorer coffin on June 15th, 2022, by retiring it in favor of Microsoft Edge.

“We are announcing that the future of Internet Explorer on Windows 10 is in Microsoft Edge,” says Sean Lyndersay, a Microsoft Edge program manager. “The Internet Explorer 11 desktop application will be retired and go out of support on June 15, 2022, for certain versions of Windows 10.”

While the Long-Term Servicing Channel (LTSC) of Windows 10 will still include Internet Explorer next year, all consumer versions will end support of the browser. Microsoft doesn’t make it clear (and we’re checking), but it’s likely that we’ll finally see the end of Internet Explorer being bundled in Windows either in June 2022 or soon after.

Internet Explorer originally launched in 1995

The alternative for most businesses will be Microsoft Edge with IE mode. Microsoft created its IE mode for Edge a couple of years ago, and it has allowed businesses to adopt the new Chromium-based browser for older legacy websites. IE mode supports older ActiveX controls and legacy sites, which are surprisingly still used by many businesses. Microsoft is promising to support this IE mode in Edge until through at least 2029.

The end of Internet Explorer has been a long time coming. Microsoft ended support for Internet Explorer 11 for the Microsoft Teams web app last year, and it’s planning to cut it off from accessing Microsoft 365 services later this year. Internet Explorer 11 will no longer be supported for Microsoft’s online services like Office 365, OneDrive, Outlook, and more on August 17th.

Microsoft has also been trying to stop people from using Internet Explorer for more than five years. Microsoft Edge first appeared in 2015, and it kicked off the end of the Internet Explorer brand. Microsoft has since labeled Internet Explorer a “compatibility solution” rather than a browser and encouraged businesses to stop using the aging browser in favor of Edge and its IE mode.

How To Fix The Memory Management Error In Windows 10

 Memory_Management  is one of the most unhelpful phrases that Microsoft suggests you search for if you run into a BSOD (Blue Screen of Death) error while running Windows 10. So, how do you fix the memory management issue?

Window 10

The first step in fixing any computer problem is isolating the issue’s source, so you know what to fix. With Window’s ominous errors, such as this one, it may be challenging to know where to begin.

Basic troubleshooting is essential to finding your memory management error. Let’s take a look at what you can do to get this fixed.

Step 1: Run Windows 10 in Safe Mode

The first thing you should do is launch Windows 10 in safe mode with basic drivers. This action allows you to check whether you still receive the BSOD Memory Management error. Essentially, this shuts down any processes the computer doesn’t need. If the memory management error ceases, you’ll know it isn’t hardware but rather something in the software, such as a patch in an update or a driver. If the problem still occurs, you may need to replace some faulty hardware. To boot your system in Safe Mode, follow the steps below.

  1. Use the Win+R keyboard shortcut and type “msconfig“ without quotes, then hit “enter.”

Run Command

    2.    Tap the “Boot” tab in the upper section of the screen.

    3.Select “Safe Boot.”


    4.Choose “Minimal” from the list of boot options.


Step 2: Run Windows Memory Diagnostic

The Windows Memory Diagnostic tool will test your SDRAM and report any problems it finds—if any at all. This step should use Safe Mode to prevent the BSOD issues you experience. However, this requirement is after affirming that your PC worked correctly in Safe Mode using Step 1 above.

  1. Press the “Windows + R” keyboard combination and type “mdsched” without quotes, then press “Enter” or click “OK.”

     2.Select the option to restart and run a check for SDRAM problems.


Upon restart, you will receive a report letting you know if you’re having a memory issue.

As the name suggests, the memory management error relates to the computer’s memory, which can be a physical problem with the installed RAM. The Windows Memory Diagnostic Tool can help discover if this is the root of the problem.

When Windows restarts, it will tell you if there is something wrong with your memory. If there is, then you’ll have to either replace the RAM yourself or send back your computer if it’s under warranty.

Step 3: Run SFC Scanner
SFC Scanner is a Microsoft tool for detecting various problems with your system, and running it seems to have solved some people’s memory management woes. Once again, this step should also be performed in Safe Mode like Step 1 and Step 2 above.

  1. In the Cortana search bar, type “cmd” without quotes, then click on “Run as administrator” in the right panel for the Command Prompt. You can’t use the right-click Start Menu option anymore since Powershell replaced Command Prompt.

    2.Once the Command Prompt opens, type “sfc/scannow” without quotes and press “Enter.”

SFC Scanner will now run through your system, seeing if it finds any disk errors to fix. Even if it doesn’t find anything, some users have found that their computers play nicer after a full scan.

Note: It is best to perform two or three rounds of scanning since the process doesn’t always detect anything on the first attempt or fixes something else and needs to find more issues.

Step 4: Look for Software Problems
Software problems are a little more challenging to pin down. Still, if the memory management error is a relatively new phenomenon, you could try undoing some of your recent software installations to see if it fixes the problem.

Specific pieces of software often link to memory management errors. You can try disabling and re-enabling newer software to see if that fixes the BSOD, or you can reload Windows 10 entirely (although this is a nuclear option).

Isolating and correcting a software issue or even a corrupted file can take a while, but it’s certainly worth it if you’re not entirely sure you’re experiencing a hardware failure.

Step 5: Update Your Graphics Card Drivers
One of the most common causes of the memory management error in Windows 10 is outdated or broken graphics card drivers. This scenario makes sense, especially since the graphics card has memory too. If you’re not running the latest version, try installing the newest available.

If you already have the latest drivers, try the “uninstall/reinstall” method. Sometimes, a driver is broken or corrupt but goes undetected. The drivers you need will depend on your graphics card, of course. Windows 10 will be able to tell you what you have in your system, but it’s likely to be onboard Intel graphics or something from Nvidia or AMD. External video cards have more memory than onboard graphics, and they are more prone to overheating.
Graphic Information

Visit the website of the manufacturer and download any updates to get your system working correctly again.

Step 6: Upgrade Your PC’s Hardware
Depending on the results of your troubleshooting adventures, it may be time to upgrade some of your system’s hardware. As software and PC technology progress, so does hardware requirements.

Before rushing out to buy new hardware, check to ensure that everything in the case is seated correctly. Perhaps you recently moved your machine, and something came loose, or your hardware could use a thorough cleaning.

If it’s a machine that you’ve built or one that is out-of-warranty, it’s time to look for new components to get your computer up and running again. It may be an opportunity for a new graphics card, or you may need more RAM. Whatever the case, if you’ve tried everything above and the issue persists, it’s likely hardware-related.

 
Design by gitstein | Bloggerized by Kuldeep