Configure or Turn Off DEP (Data Execution Prevention) in Windows

It can cause issues with some older third-party software

Data Execution Prevention (DEP) is one of those ‘blursed’ things. It’s a blessing most of the time when it does its job and doesn’t interfere, but cursed when it does interfere. 

Let’s look at DEP and how to configure it, or turn DEP off, depending on your needs.

What Is DEP & What Does It Do?
According to Microsoft, DEP is :
“…a set of hardware and software technologies that perform additional checks on memory to help prevent malicious code from running on a system.”  

Dell simplifies it a bit and tells us that DEP

“…can help protect your computer by monitoring your programs to make sure that they use system memory safely.”


What does that mean? There are certain areas in the computer’s memory which aren’t intended to have code running in them, but sometimes code does run there. 

Usually, the code that will run there is malicious. DEP will monitor those areas and if it sees something going on in those areas it will shut it down. If you want to get in-depth about how it works, read Microsoft’s detailed description of Data Execution Prevention.

So Why Does DEP Cause Problems?
Even today, computers are dumb. They cannot reason, they can only use the most basic of logic. Plus, that logic is put into them by humans so computers also get our mistakes put into them. 

Sometimes, good programs will wander off into the areas that DEP monitors and work in those spaces.


When this happens, DEP will sometimes shut the entire program down and let you know via an error message. But sometimes DEP will just cause the program to run very poorly and there won’t be anything obvious to tell you why. 

What Programs Have Problems With DEP?
Programs that conflict with DEP are typically older programs or built on old codebases. A lot of Enterprise Resource Planning (ERP) software is built on codebases that go back to the 1970s. There was no DEP then, so the program will go into areas that DEP patrols.

64-bit programs were created after DEP was well established, so they were developed to comply. Most programs that conflict with DEP will be 32-bit programs. 

Non-Microsoft programs that interact with Windows Services heavily or run their own Windows Services may be tripped up by DEP. If that is the case, the vendor will recommend to completely turn off DEP.

For the home user, old games that are 32-bit, and some emulators for playing even older games, are the most likely to conflict with DEP.

Old device drivers or drivers downloaded from unofficial sources may also trigger DEP errors. Only download drivers from the hardware manufacturer or Microsoft, and update your drivers regularly.

How Do I Know If DEP Is The Problem?
You may have to go into Event Viewer and sift through the logs for Event ID 1000. If you find one, it may look like this:

Event ID : 1000 - DEP Error : Generic host for Win32 servicesGeneric Host Process for Win32 Services - DEP : Application Error
Event Type: Error
Event Source: Application Error
Event Category: (100)
Event ID: 1000
 You may see other errors referencing things like:

  • 0xFC:ATTEMPTED_EXECUTE_OF_NOEXECUTE_MEMORY – occurs when a device driver is trying to run in memory. It may be a bad or outdated driver. You’ll want to update your drivers. 
  • STATUS_ACCESS_VIOLATION (0xc0000005) – occurs when programs are trying to run in DEP protected memory space.
How To Configure Or Turn Off DEP
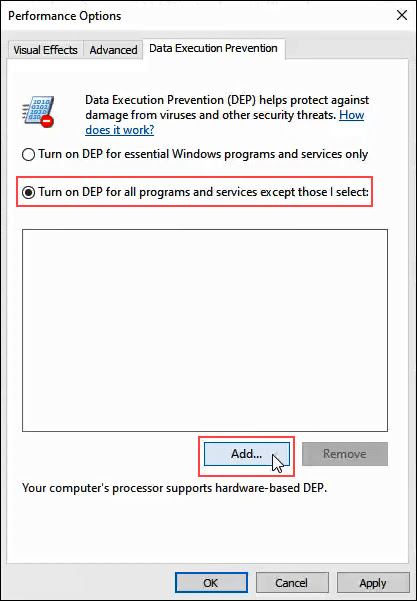
In Windows 10, DEP defaults to the setting Turn on DEP for essential Windows programs and services only. Most of the time, this is sufficient. It means that the majority of your programs will be ignored by DEP. 

But if DEP helps protect the computer and it doesn’t have a performance hit, you may want to select Turn on DEP for all programs except those that I select. Then if you find a program that has a problem with DEP, we can add it as an exception. Let’s look at how to do that.
  • Open the Control Panel then open System.

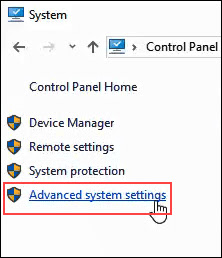
  • On the left side of the System window, click on Advanced System Settings.
  • The System Properties window should open and already be set to the Advanced tab. In the Performance area, click on Settings.
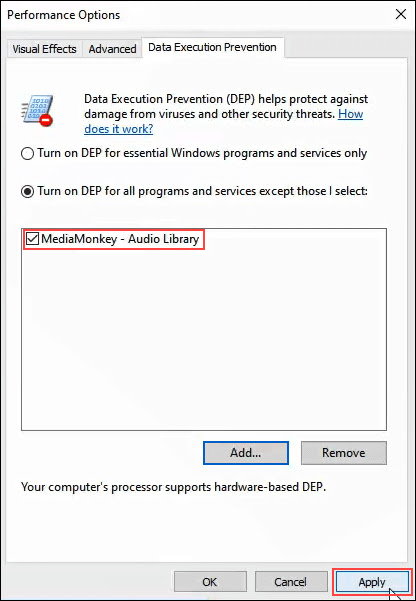
  • In the Performance Options window, click on the Data Execution Prevention tab.


  • With Turn on DEP for all programs except those that I select selected, click on the Add button near the bottom of the window.


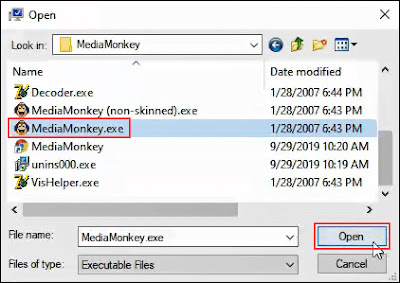
  • Navigate to the executable for the program that we’d like to add as an exception. It will most likely be in C:/Program Files (x86). 
  • In this example, we’re adding MediaMonkey, an old music player utility. Click on the .exe file once we find it and click on Open.


  • In Performance Options, click on Apply. Now, MediaMonkey will run outside of DEP protection while all others will run within DEP protection.
Turn DEP Completely Off

If you want to turn DEP completely off, we advise only doing that as part of troubleshooting an issue. DEP is there for your protection. 

Since it’s something that isn’t advised, there isn’t a good point-and-click way to do it. Let’s look at how we can turn off DEP.
  • Open the Command window as Administrator. Do this by typing cmd in the program search field near the Start menu.

  • Enter the command bcdedit.exe /set {current} nx AlwaysOff and press enter.


bcdedit.exe is a Windows utility for editing boot configuration data, hence     .

/set tells bcedit to set an option value entry in the boot configuration.

{current} tells becedit to work with the boot configuration being used right now.

nx is short for no execute and is the setting name for DEP in the boot configuration.

AlwaysOff is self-explanatory.
  • Restart the computer.
  • DEP will now be completely, and permanently off.

Turn DEP On For Everything
To turn DEP on for absolutely everything, the process and command is like above.

  • Open the Command window as Administrator, following the instructions in the procedure above.
  • Enter the command bcdedit.exe /set {current} nx AlwaysOn. 
        

  • Restart the computer.
  • DEP will be turned on and all programs monitored.
After turning DEP to being always on or always off, it CANNOT be changed via the Data Execution Prevention tab in system settings. 

Let’s look at how to change it so that the radio buttons in the DEP tab can be used again.

Set DEP Back To Default Behavior
To set DEP behavior back to default and make it manageable again via system settings, do the following.
  • Open the Command window as Administrator.
  • Enter the command bcdedit.exe /set {current} nx OptIn.

  • Restart the computer.
  • Now the radio buttons in the DEP tab in systems settings are accessible again.
To DEP Or Not To DEP
We recommend leaving DEP on its default setting of Turn on DEP for essential Windows programs and services only, unless it’s necessary to change it to troubleshoot problems that may be DEP-related.

Understanding the Impact of Apache Log4j Vulnerability

 More than 35,000 Java packages, amounting to over 8% of the Maven Central repository (the most significant Java package repository), have been impacted by the recently disclosed log4j vulnerabilities (1, 2), with widespread fallout across the software industry. The vulnerabilities allow an attacker to perform remote code execution by exploiting the insecure JNDI lookups feature exposed by the logging library log4j. This exploitable feature was enabled by default in many versions of the library.

This vulnerability has captivated the information security ecosystem since its disclosure on December 9th because of both its severity and widespread impact. As a popular logging tool, log4j is used by tens of thousands of software packages (known as artifacts in the Java ecosystem) and projects across the software industry. User’s lack of visibility into their dependencies and transitive dependencies has made patching difficult; it has also made it difficult to determine the full blast radius of this vulnerability. Using Open Source Insights, a project to help understand open source dependencies, we surveyed all versions of all artifacts in the Maven Central Repository to determine the scope of the issue in the open source ecosystem of JVM based languages, and to track the ongoing efforts to mitigate the affected packages.

How widespread is the log4j vulnerability?

As of December 16, 2021, we found that 35,863 of the available Java artifacts from Maven Central depend on the affected log4j code. This means that more than 8% of all packages on Maven Central have at least one version that is impacted by this vulnerability. (These numbers do not encompass all Java packages, such as directly distributed binaries, but Maven Central is a strong proxy for the state of the ecosystem.)

As far as ecosystem impact goes, 8% is enormous. The average ecosystem impact of advisories affecting Maven Central is 2%, with the median less than 0.1%.


Direct dependencies account for around 7,000 of the affected artifacts, meaning that any of its versions depend upon an affected version of log4j-core or log4j-api, as described in the CVEs. The majority of affected artifacts come from indirect dependencies (that is, the dependencies of one’s own dependencies), meaning log4j is not explicitly defined as a dependency of the artifact, but gets pulled in as a transitive dependency.


What is the current progress in fixing the open source JVM ecosystem?

We counted an artifact as fixed if the artifact had at least one version affected and has released a greater stable version (according to semantic versioning) that is unaffected. An artifact affected by log4j is considered fixed if it has updated to 2.16.0 or removed its dependency on log4j altogether.

At the time of writing, nearly five thousand of the affected artifacts have been fixed. This represents a rapid response and mammoth effort both by the log4j maintainers and the wider community of open source consumers.

That leaves over 30,000 artifacts affected, many of which are dependent on another artifact to patch (the transitive dependency) and are likely blocked.


Why is fixing the JVM ecosystem hard?

Most artifacts that depend on log4j do so indirectly. The deeper the vulnerability is in a dependency chain, the more steps are required for it to be fixed. The following diagram shows a histogram of how deeply an affected log4j package (core or api) first appears in consumers dependency graphs. For greater than 80% of the packages, the vulnerability is more than one level deep, with a majority affected five levels down (and some as many as nine levels down). These packages will require fixes throughout all parts of the tree, starting from the deepest dependencies first.


Another difficulty is caused by ecosystem-level choices in the dependency resolution algorithm and requirement specification conventions.
In the Java ecosystem, it’s common practice to specify “soft” version requirements — exact versions that are used by the resolution algorithm if no other version of the same package appears earlier in the dependency graph. Propagating a fix often requires explicit action by the maintainers to update the dependency requirements to a patched version.
This practice is in contrast to other ecosystems, such as npm, where it’s common for developers to specify open ranges for dependency requirements. Open ranges allow the resolution algorithm to select the most recently released version that satisfies dependency requirements, thereby pulling in new fixes. Consumers can get a patched version on the next build after the patch is available, which propagates up the dependencies quickly. (This approach is not without its drawbacks; pulling in new fixes can also pull in new problems.)

How long will it take for this vulnerability to be fixed across the entire ecosystem?
It’s hard to say. We looked at all publicly disclosed critical advisories affecting Maven packages to get a sense of how quickly other vulnerabilities have been fully addressed. Less than half (48%) of the artifacts affected by a vulnerability have been fixed, so we might be in for a long wait, likely years.
But things are looking promising on the log4j front. After less than a week, 4,620 affected artifacts (~13%) have been fixed. This, more than any other stat, speaks to the massive effort by open source maintainers, information security teams and consumers across the globe.

Where to focus next?
Thanks and congratulations are due to the open source maintainers and consumers who have already upgraded their versions of log4j. As part of our investigation, we pulled together a list of 500 affected packages with some of the highest transitive usage. If you are a maintainer or user helping with the patching effort, prioritizing these packages could maximize your impact and unblock more of the community.
We encourage the open source community to continue to strengthen security in these packages by enabling automated dependency updates and adding security mitigations. Improvements such as these could qualify for financial rewards from the Secure Open Source Rewards program.
You can explore your package dependencies and their vulnerabilities by using Open Source Insights.


Microsoft is finally retiring Internet Explorer in 2022

 Internet Explorer will no longer be supported in June 2022


Microsoft is finally retiring Internet Explorer next year, after more than 25 years. The aging web browser has largely been unused by most consumers for years, but Microsoft is putting the final nail in the Internet Explorer coffin on June 15th, 2022, by retiring it in favor of Microsoft Edge.

“We are announcing that the future of Internet Explorer on Windows 10 is in Microsoft Edge,” says Sean Lyndersay, a Microsoft Edge program manager. “The Internet Explorer 11 desktop application will be retired and go out of support on June 15, 2022, for certain versions of Windows 10.”

While the Long-Term Servicing Channel (LTSC) of Windows 10 will still include Internet Explorer next year, all consumer versions will end support of the browser. Microsoft doesn’t make it clear (and we’re checking), but it’s likely that we’ll finally see the end of Internet Explorer being bundled in Windows either in June 2022 or soon after.

Internet Explorer originally launched in 1995

The alternative for most businesses will be Microsoft Edge with IE mode. Microsoft created its IE mode for Edge a couple of years ago, and it has allowed businesses to adopt the new Chromium-based browser for older legacy websites. IE mode supports older ActiveX controls and legacy sites, which are surprisingly still used by many businesses. Microsoft is promising to support this IE mode in Edge until through at least 2029.

The end of Internet Explorer has been a long time coming. Microsoft ended support for Internet Explorer 11 for the Microsoft Teams web app last year, and it’s planning to cut it off from accessing Microsoft 365 services later this year. Internet Explorer 11 will no longer be supported for Microsoft’s online services like Office 365, OneDrive, Outlook, and more on August 17th.

Microsoft has also been trying to stop people from using Internet Explorer for more than five years. Microsoft Edge first appeared in 2015, and it kicked off the end of the Internet Explorer brand. Microsoft has since labeled Internet Explorer a “compatibility solution” rather than a browser and encouraged businesses to stop using the aging browser in favor of Edge and its IE mode.

Microsoft is pushing the Control Panel aside in its latest Windows 11 updates

 One more step to simplifying Windows

Microsoft is finally signaling the end of the legacy Control Panel in Windows 11. The software giant introduced a number of changes in its Settings section of Windows 11 earlier this year, and this month the company has started testing even more ways to replace Control Panel functionality.

In new test versions of Windows 11, Microsoft has moved the advanced network settings into a new page in the Settings app, which includes sharing options for folders, printers, and network discovery options. Some entry points to the network and device settings in Windows 11 also now redirect to the Settings app, instead of forcing you into the Control Panel.

Elsewhere, links to the section of the Control Panel used to uninstall apps now redirect to the Settings app. Even the section for uninstalling Windows Updates is now part of the Settings app, instead of being housed in the Control Panel.

These latest changes are welcome, and come after attempts to move away from the Control Panel in Windows 10. Microsoft originally introduced a separate Settings app in Windows 8, as a way to overhaul its traditional Control Panel. The two have existed alongside each other for legacy support reasons, just like how Microsoft had two browsers (Internet Explorer and Microsoft Edge) inside Windows 10.

The Settings app was designed to be a new broom that sweeps clean, but there are still plenty of settings that require you to head into the Control Panel. Windows 10 improved things, and Windows 11 offers an even more modern take on how users control their PC.

Microsoft describes these latest changes as an “ongoing effort to bring over settings from Control Panel into the Settings app.” So it’s clear Microsoft is committed to cleaning this area of Windows up, and eventually making the Control Panel redundant.

Windows 11 has largely been an attempt to modernize and simplify a Windows operating system that has been used the same way for decades. Microsoft didn’t quite go far enough with the Control Panel for the initial release of Windows 11, but in other areas like the taskbar it has simplified things far too much. These monthly changes pave the way for Microsoft to finalize what has felt like an unfinished version of Windows so far.

Google is turning off the controls for OnHub routers at the end of 2022


Google’s insistence on cloud-based controls for its networking products has occasionally caused issues, even though it was supposed to make life with OnHub routers simple. Now it will be a reason pushing anyone still using the OnHub to find a replacement by the end of next year when Google’s apps stop allowing owners to change the settings on their devices. An email went out to users, and a support page revealed the changeover is scheduled for December 19th, 2022 (via Droid-Life).

When it still seemed unusual for Google and Amazon to make their own hardware, Google teamed up with TP-Link and, eventually, Asus to build OnHub routers that made a point of blending in seamlessly with the rest of your house. They had slick mobile apps to simplify setup and controls, plus a style that blended in so people were more likely to place them in a central location, which could improve WiFi coverage.

Before December 19, 2022

Your OnHub router will continue to work as normal, but won’t receive any new software features or security updates. We recommend you upgrade to a new Wi-Fi setup today. A special discount code has been emailed to OnHub users only, for 40% off Nest Wifi on the Google Store. This promotional code is available for a limited time.*

After December 19, 2022

Your OnHub router will still provide a Wi-Fi signal, but you’ll no longer be able to manage it with the Google Home app.
You won’t be able to update things like Wi-Fi network settings, add additional Wifi devices, or run speed tests.
Google Assistant features like “Hey Google, pause my Wi-Fi” will stop working.
OnHub performance can’t be guaranteed.

The idea was that by styling them to fit with interior decorations, people would be more likely to place them in a central location, thereby improving Wi-Fi coverage. They even had slick mobile apps to control them so that you didn’t have to dig through ugly menus, but now those apps are gone, with the settings merged into Google’s Home app.


After the shutdown date, the routers will still work, but you won’t be able to adjust their settings, get any updates, or really do any troubleshooting. For its part, Google is offering owners a 40 percent discount on a Nest Wifi unit, which should knock a fair amount off of pricing that currently starts at $149 for a base unit by itself or $189 for a base and one extender.

For routers that are several years old by now, at least, that doesn’t feel like an unfair offer to get a replacement that we called “even faster and more capable than before.” Still, it doesn’t change the feeling that buying one of these routers means “owning” it only for so long as Google is willing to provide support. How many of your supposedly smart devices will quickly turn into bricks and electronic waste if someone flips a switch on the back end?

How To Fix The Memory Management Error In Windows 10

 Memory_Management  is one of the most unhelpful phrases that Microsoft suggests you search for if you run into a BSOD (Blue Screen of Death) error while running Windows 10. So, how do you fix the memory management issue?

Window 10

The first step in fixing any computer problem is isolating the issue’s source, so you know what to fix. With Window’s ominous errors, such as this one, it may be challenging to know where to begin.

Basic troubleshooting is essential to finding your memory management error. Let’s take a look at what you can do to get this fixed.

Step 1: Run Windows 10 in Safe Mode

The first thing you should do is launch Windows 10 in safe mode with basic drivers. This action allows you to check whether you still receive the BSOD Memory Management error. Essentially, this shuts down any processes the computer doesn’t need. If the memory management error ceases, you’ll know it isn’t hardware but rather something in the software, such as a patch in an update or a driver. If the problem still occurs, you may need to replace some faulty hardware. To boot your system in Safe Mode, follow the steps below.

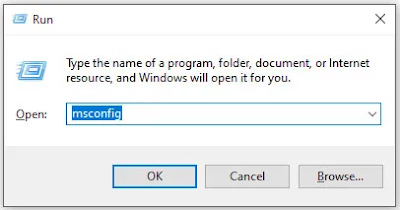
  1. Use the Win+R keyboard shortcut and type “msconfig“ without quotes, then hit “enter.”

Run Command

    2.    Tap the “Boot” tab in the upper section of the screen.

    3.Select “Safe Boot.”


    4.Choose “Minimal” from the list of boot options.


Step 2: Run Windows Memory Diagnostic

The Windows Memory Diagnostic tool will test your SDRAM and report any problems it finds—if any at all. This step should use Safe Mode to prevent the BSOD issues you experience. However, this requirement is after affirming that your PC worked correctly in Safe Mode using Step 1 above.

  1. Press the “Windows + R” keyboard combination and type “mdsched” without quotes, then press “Enter” or click “OK.”

     2.Select the option to restart and run a check for SDRAM problems.


Upon restart, you will receive a report letting you know if you’re having a memory issue.

As the name suggests, the memory management error relates to the computer’s memory, which can be a physical problem with the installed RAM. The Windows Memory Diagnostic Tool can help discover if this is the root of the problem.

When Windows restarts, it will tell you if there is something wrong with your memory. If there is, then you’ll have to either replace the RAM yourself or send back your computer if it’s under warranty.

Step 3: Run SFC Scanner
SFC Scanner is a Microsoft tool for detecting various problems with your system, and running it seems to have solved some people’s memory management woes. Once again, this step should also be performed in Safe Mode like Step 1 and Step 2 above.

  1. In the Cortana search bar, type “cmd” without quotes, then click on “Run as administrator” in the right panel for the Command Prompt. You can’t use the right-click Start Menu option anymore since Powershell replaced Command Prompt.

    2.Once the Command Prompt opens, type “sfc/scannow” without quotes and press “Enter.”

SFC Scanner will now run through your system, seeing if it finds any disk errors to fix. Even if it doesn’t find anything, some users have found that their computers play nicer after a full scan.

Note: It is best to perform two or three rounds of scanning since the process doesn’t always detect anything on the first attempt or fixes something else and needs to find more issues.

Step 4: Look for Software Problems
Software problems are a little more challenging to pin down. Still, if the memory management error is a relatively new phenomenon, you could try undoing some of your recent software installations to see if it fixes the problem.

Specific pieces of software often link to memory management errors. You can try disabling and re-enabling newer software to see if that fixes the BSOD, or you can reload Windows 10 entirely (although this is a nuclear option).

Isolating and correcting a software issue or even a corrupted file can take a while, but it’s certainly worth it if you’re not entirely sure you’re experiencing a hardware failure.

Step 5: Update Your Graphics Card Drivers
One of the most common causes of the memory management error in Windows 10 is outdated or broken graphics card drivers. This scenario makes sense, especially since the graphics card has memory too. If you’re not running the latest version, try installing the newest available.

If you already have the latest drivers, try the “uninstall/reinstall” method. Sometimes, a driver is broken or corrupt but goes undetected. The drivers you need will depend on your graphics card, of course. Windows 10 will be able to tell you what you have in your system, but it’s likely to be onboard Intel graphics or something from Nvidia or AMD. External video cards have more memory than onboard graphics, and they are more prone to overheating.
Graphic Information

Visit the website of the manufacturer and download any updates to get your system working correctly again.

Step 6: Upgrade Your PC’s Hardware
Depending on the results of your troubleshooting adventures, it may be time to upgrade some of your system’s hardware. As software and PC technology progress, so does hardware requirements.

Before rushing out to buy new hardware, check to ensure that everything in the case is seated correctly. Perhaps you recently moved your machine, and something came loose, or your hardware could use a thorough cleaning.

If it’s a machine that you’ve built or one that is out-of-warranty, it’s time to look for new components to get your computer up and running again. It may be an opportunity for a new graphics card, or you may need more RAM. Whatever the case, if you’ve tried everything above and the issue persists, it’s likely hardware-related.

Git vs. SVN: Which version control system is right for you?

 Version control systems are integral to building software. They combine your repository of project files with a history of all your code changes, making it easy to edit and understand your code over time.

The main benefit of using a version control system is that it keeps your team’s workflows organized as they work through various types of releases. With one in place, team members can easily research, track, and undo code. They can work on the same code simultaneously without code conflicts. Plus, the whole team can track who made what changes, when, and why.

But before you implement a version control system into your team’s workflow, you need to figure out which one is right for you. While most options out there have similar benefits, their differences are important.

Git vs. SVN version control systems

With all version control systems, project files sit on a server that you push your files to when you have completed your work on your local machine. However, deciding whether to use a centralized version control system (like SVN) or a distributed version control system (like Git) will affect how you commit changes.

Remember, not all version control systems fit all teams and all needs. A method that works perfectly for one company may be entirely wrong for your team. To determine which system to use, you need to look at how each system works.

What is SVN?

Apache Subversion, also known as Subversion, SVN represents the most popular centralized version control system on the market. With a centralized system, all files and historical data are stored on a central server. Developers can commit their changes directly to that central server repository.

Work is comprised of three parts:

  1. Trunk: The trunk is the hub of your current, stable code and product. It only includes tested, unbroken code. This acts as a base where all changes are made from.
  2. Branches: Here is where you house new code and features. Using a copy of the trunk code, team members conduct research and development in the branch. Doing so allows each team member to work on the enhanced features without disrupting each other’s progress.
  3. Tags: Consider tags a duplicate of a branch at a given point in time. Tags aren’t used during development, but rather during deployment after the branch’s code is finished. Marking your code with tags makes it easy to review and, if necessary, revert your code.

Here’s how this process looks: To create a new feature you first branch the code from the trunk, i.e. take an exact copy of the trunk and place it into a new folder within the branches area. Then you work on your feature. When you’re done, you merge your changes back into the trunk.

The benefit of branching is the ability to make commits into the branch without breaking the trunk. You only merge into the trunk when your code is error-free. This keeps your trunk stable. And users generally appreciate how easy it is to use and understand SVN.

However, working on one central server means there is a single point of failure. If there is an error, it can destroy all builds. Limited offline access is also a frequent point of complaint.

What is Git?

While centralized systems were the version control system of choice for nearly a decade, Git has surpassed them in recent years.

Unlike SVN, Git utilizes multiple repositories: a central repository and a series of local repositories. Local repositories are exact copies of the central repository complete with the entire history of changes.

The Git workflow is similar to SVN, but with an extra step: to create a new feature, you take an exact copy of the central repository to create your local repository on your local machine (you can think of this as your “local trunk”). Then you work on your local repository exactly as you would in SVN by creating new branches, tags, etc. When you’re done, you merge your branches into your local repository (i.e. local trunk). When you’re ready to merge into the central repository, you push your changes from your local repository to the central repository.

Many people prefer Git for version control for a few reasons:
  1. It’s faster to commit. Because you commit to the central repository more often in SVN, network traffic slows everyone down. Whereas with Git, you’re working mostly on your local repository and only committing to the central repository every so often.
  2. No more single point of failure. With SVN, if the central repository goes down or some code breaks the build, no other developers can commit their code until the repository is fixed. With Git, each developer has their own repository, so it doesn’t matter if the central repository is broken. Developers can continue to commit code locally until the central repository has been fixed, and then they can push their changes.
  3. It’s available offline. Unlike SVN, Git can work offline, allowing your team to continue working without losing features if they lose connection.

Teams also opt for Git because it’s open source and cross-platform. That means that support is available for all platforms, multiple sets of technologies, languages, and frameworks. And it’s supported by virtually all operating systems.

There is one con teams find frustrating: the ever-growing complexity of history logs. Because developers take extra steps when merging, history logs of each issue can become dense and difficult to decipher. This can potentially make analyzing your system harder.

Alternatives to Git

Git vs. GitHub

Although similar in name, Git and GitHub offer very different services. While Git allows users to make edits and make changes to and track their repository of code, GitHub is a cloud-based host that allows you to upload and manage Git repositories in an open-source format.

By managing a project in GitHub, all of your team can make edits simultaneously without affecting the trunk. Users can copy the code from GitHub to their local machines to test and make edits. In order to reintegrate a branch back into the trunk, the user must push or pull the changes from their local machine. And, if you’re working on an open-source project, anyone using GitHub, on your team or otherwise, can create branches to make edits on the Git uploaded to the hosting platform. In this way, the code is shareable to others who may be working on similar projects.

Git vs. Perforce

While Git and Perforce offer many of the same benefits, there are still a number of differences that make one better suited than the other depending on the team.

  1. Git is decentralized, or distributed. This means that to edit, developers download the source code onto their local machines to work and make edits, while Perforce is centralized, meaning all developers are making edits to one master branch kept on a server and accessible to all team members.
  2. Git is focused on code. While both store and track code in trunks and branches, Perforce also stores non-code assets. If developers are working with graphics, binaries, or other elements, Perforce can store these elements just like the code repositories.

So, the more non-code based assets developers are working on and the more geographically sprawled they are, Perforce becomes a better and better option. However, Perforce does not allow for multiple developers to work on the same code and conduct changes all at once.

Git vs. TFS

Like Perforce, TFS (also known as TFVC) is a centralized version control system (CVCS). So there is one version of code stored in a main server that all developers on a team can view and work on at a single point in time. Working on solely a centralized version of the build increases the chances of breaking the trunk with a small error since it can’t be committed and tested on a local machine before reintegrating. It also increases the chance of losing work along the way if your local machine or the central server goes down or has an issue.

Git vs. Mercurial

Git and Mercurial offer largely similar functionality, but with a few key differences. Both Git and Mercurial are decentralized version control systems (DVCS), so both allow multiple developers to be working on the same source code downloaded to their local machines at the same time and reintegrate commits as changes are made and tested.

Unlike Git, however, Mercurial permanently stores each branch into commits, making it impossible to remove or edit past work, making it more likely for the trunk to fail if bugs are pushed to production. For this reason and the enhanced number of options available in Git, more experienced, professional developers with choose Git over Mercurial every time.

In conclusion

Whether your team uses Git, SVN, or another alternative, you’ll benefit from being able to track and review your code for better releases. Just be sure to choose an issue tracking software that supports your choice, so you’re able to properly track that work over time.

How to Capture a Scrolling Screenshot in Windows 10


Scrolling image

Windows 10 offers many ways to capture a screenshot. To take a screenshot, all you need to do is press Ctrl + PRTSC or Fn + PRTSC and you instantly have a screenshot. There is even a built-in Snipping Tool that allows you to capture a section of a window as well as pop-up menus.

But all those methods only allow you to capture content that is within the dimensions of the browser’s viewing area. What if you want to capture a screenshot of a scrolling window of a webpage, document, or any other content that’s beyond the viewable area? In such cases your only option would be to use a third-party application

In this post you’ll learn the best tools to capture a scrolling screenshot in Windows.

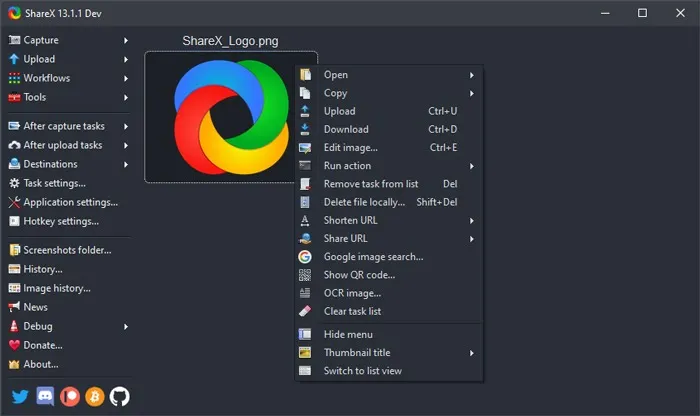
1. ShareX

Available to buy on its own website as well as the Steam gaming platform (where it has “Overwhelmingly Positive” reviews, as well as having its own well-populated Discord channel, the free screen capture app ShareX is validated by its broad popularity in the discerning game-streaming community.

ShareX

The open-source app is widely used by gamers for its robust screen-capture options. Among those features – which include video capture, GIFs, region-select, workflows, as well as a huge number of filters and effects to add to your captures – is the “scrolling screenshot” option you’re looking for here.

Just open ShareX, click Capture then “Scrolling capture”. Once you select your region, you can specify which window you want to scroll, whether you want there to be a delay before the screen-capture starts, and how many scrolls you want to capture.

It’s nice and easy to use, and unlike other options on this list it’s free without caveats, maintained as it is by a diligent community of open-source developers. Beyond just scrolling, it also functions as an all-in-one screen capture suite, which is pretty impressive given its small file size.

2. PicPick

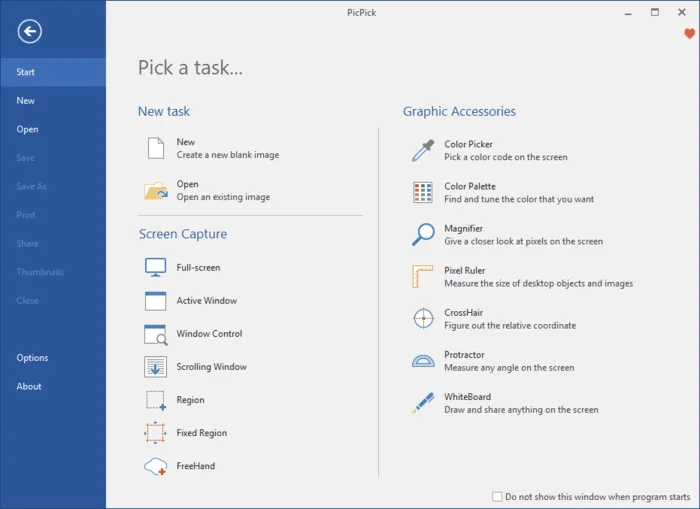
PicPick is a robust screen-capture and image-editing software developed and owned by NGWIN. It’s my personal favorite screen capture tool, and I use it all the time. The best thing about PicPick is that it’s free for personal use and packs some cool features you won’t find even in the paid programs.

PicPick

As far as screen capture is concerned, PicPick offers seven screen capture modes: Full screen, Active Window, Window Control, Scrolling Window, Region, Fixed Region, and FreeHand. Each of these modes suits different scenarios and can help you customize your screenshots to your liking. For example, the Region mode can help you to isolate and capture a dialogue box without background noise.

Fixed Region mode allows you to set your desired screenshot length and width in terms of pixel count which helps to ensure all your screenshots are uniform. It also has a Scrolling Window mode that lets you capture a scrolling screenshot of a webpage or a document in just a few clicks.

PicPick Options

To capture a scrolling window, follow the steps below:

1. Press and hold Ctrl + Alt together, then press PRTSC. A rectangular box highlighted in red will appear.

2. Press and hold the left mouse button, then drag the mouse on the scrolling window to select the area.

3. Release the mouse click and an auto-scroll will happen slowly. After that, your entire window will be captured in just a few seconds.

PicPick also comes with a pixel ruler which can be used to measure the size of images that are displayed on your screen, a virtual whiteboard that allows users to draw on the screen, and crosshairs for pinpointing the positions of relative pixels.

3.Snagit

Snagit is a popular screenshot-capture and video-recording software created and distributed by TechSmith. It features a sleek interface that is more focused than PicPicks.

Snagit
    

It also boasts of superior image-editing functionalities that are more polished than those of PicPicks. However, Snagit is not free and costs $50 per license, which is relatively high.

Because the main focus of Snagit is on screenshot capture, it comes with advanced screen capturing and editing features that blow the competition out of the water. For example, it has a Panoramic Capture feature that allows you to capture just a portion of a scrolling Window.

Capturing a scrolling window on Snagit is also easier and more user-friendly. All you have to do is navigate to the all-in-one-tab and click the “Capture” button. Then click on the yellow arrows depending on the direction you want to scroll. Snagit will capture everything visible on the window and create a single image that you can edit. Here’s a short video on how to capture a scrolling screenshot with Snagit.

Besides capturing screenshots, Snagit can also record screen activity. Its superior editing features also make it the best tool for creating tutorials.

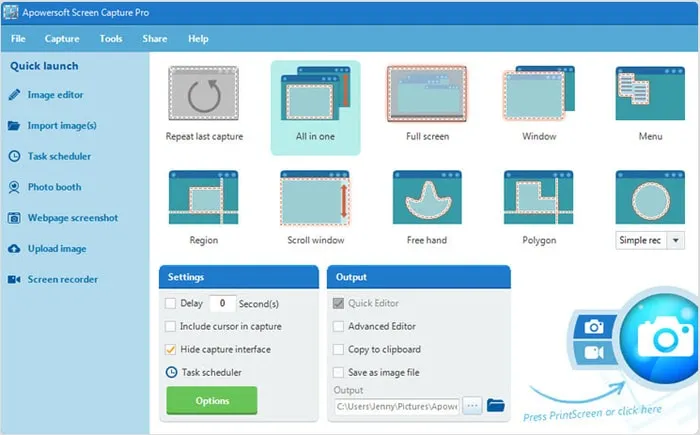
4. Apowersoft Screen Capture Pro

Apowersoft Screen Capture Pro is an innovative and highly-customizable screenshot-capture and image-editing tool. The program leaves no stone unturned when it comes to screenshot capturing, thanks to its ten screenshot modes, which includes Scrolling screenshots, Menu, and Freehand, just to mention a few.

Apowersoft

The scrolling Window capture mode allows you to capture an entire webpage, document, or browser, including contents hidden from the viewer. It also comes with a “Task Scheduler” that you can also use to take automatic screenshots.

In addition to screenshot capturing, Apowersoft Screen Capture Pro comes with a robust image editor which provides a wealth of options for you to edit your screenshots. What’s more, you can also use this tool to record the screen, upload, and share online. However, the program is quite expensive. A lifetime license goes for $79.95. You can also opt for monthly subscriptions starting from $12.95 per month.

5.GoFullPage - Full Page Screen Capture

Capture a screenshot of your current page in entirety and reliably—without requesting any extra permissions! -GoFullPage

The simplest way to take a full page screenshot of your current browser window. Click on the extension icon (or press Alt+Shift+P), watch the extension capture each part of the page, and be transported to a new tab of your screenshot where you can download it as an image or PDF or even just drag it to your desktop.

*No bloat, no ads, no unnecessary permissions, just a simple way to turn a full web page into an image.*

The advanced screen capture technology handles complex pages—including inner scrollable elements as well as embedded iframes—unlike any other extension. If you encounter an issue, please report it via the customer support flag icon on the capture page, so we can improve the extension for you and everyone else who uses it.

Knowing how to capture scrolling screenshots can be of great use to you, especially if you’re looking into creating some instructional content. Scrolling screenshots can also come in handy when you want to report software issues, as you’ll be able to point out the issues clearly.

7 Ways to Connect Android Phone to TV


Hey guys, Today in this post I’ll tell you, 7 Ways to Connect Android Phone to TV. Sometime this thought comes in your mind that if you can connect your android phone with your TV and can play music, songs, videos or games on it but many people are not knowing that it can be done so easily. Display of our android phone is much smaller. So that, we aren’t able to enjoy games and videos on it but if we can watch it on the screen of our TV then it will be much more enjoyable than that of watching it on mobile screen. If smart or non smart TV is there at your home then you can connect your android phone with your TV and watch your mobile screen on TV. Connecting android phone to TV is very simple only you should know how to connect it.  
Connect Android Phone To TV
Now the most important thing is that if you have TV in your house then what kind of is smart or non-smart? Because if you have smart TV then you can connect your android phone to TV with wifi without any wire. But if you have a non-smart TV then you have to use the wire to connect them. Means smart TV and non-smart TV have different ways of connecting with android phone. In today’s post, we are going to tell you about the two types of method, which can help you connect with your android phone to TV. After reading this post, you can connect any kind of TV to your android phone. There are many types of way to connecting them.

Google's New Tool Alerts When You Use Compromised Credentials On Any Site


With so many data breaches happening almost every week, it has become difficult for users to know if their credentials are already in possession of hackers or being circulated freely across the Internet.
Thankfully, Google has a solution.

Doctor Implanted 6 MicroChips Under His Skin to Unlock Doors and Secure Data


Biohacking could be a next big thing in this smart world.
At the beginning of this month, several dozen employees of Three Square Market (32M) received microchip implants in their hands during a "chip party," allowing them to log into their office computers, open doors, and pay for food and drinks, by simply waving their hands.
But, biohacking is already becoming common in Russia.

8 Powerful Conference Call Platforms Worth Considering

Conference calling technology has developed dramatically since the days of sitting around a long board meeting table, hoping that the suit on the other end did not hear your little outburst, commenting in a manner that should be saved for happy hour or for your last day.  Technology has people connecting in new, vibrant ways across all  of platforms: social media, email, mobile apps, group video, global teaming and other such innovative ways.  Sort of makes you think for a second, why bother having an office building?

“Hello? Hello!  Can you hear me?  It’s me, your teammate! Can you repeat that?”

Skype’s first appearance in 2003 rang in a new era of doers.  Currently, there are hundreds of ways for teams to communicate, now it is a matter of finding the perfect balance.  Technology is constantly upgraded, allowing us to get fancy; employing new web-based technologies as well as appealing aesthetics, and there is now a modern spin on conference calling services. Here are eight powerful alternatives worth checking out.

Bitcoin fraud: How investors lost Rs 22,000 crore

Bitcoin fraud: How investors lost Rs 22,000 crore
It was too good a deal — earn 1% daily interest and double your money in 100 days. Too good to be true, hordes of rich investors in Gujarat realised a year later when the BitConnect platform folded up after pocketing roughly Rs 22,000 crore of their money in Bitcoin.
For many, it was a double whammy after the jolt of demonetisation. In fact, the Bitcoin craze had started in the state as people looked for safe ways to launder their piles of black money after November 2016.
“The transactions were anonymous, it did not require any proof, and best of all, it could be operated from anywhere in the world. A cryptocurrency boom started overnight,” Sunny Vaghela, CTO of an Ahmedabad-based IT firm, told TOI. Surat became the trade’s hub with numerous ‘equity brokers’, who juggled different cryptocurrencies for maximum profit.

 
Design by gitstein | Bloggerized by Kuldeep